Hello friends, in this post we will understand how yoga asana helps to boost immunity and which asanas shall be performed to get maximum benefit in strengthening our immunity.
How is our immunity system affected?
There are many reasons for the immune system getting deteriorated. Some of them are having bad habits like smoking and drinking, not keeping yourself clean, living in an unhealthy environment, stress, anxiety, or depression and so on. Some medicines also decrease white blood cells count. It is very important for us to find a natural remedy to keep our immune system healthy.
If we fail to take that responsibility then all the body organs will be affected, like the capacity of the lungs, blood circulation, clarity in the nasal area, affect the liver etc.
How does yoga asana help in boosting immunity?
Practicing yoga asana that open the chest and throat is good for stimulating the thymus, and inversion poses can help improve the flow of lymph and immune cells through the body. Twisting poses and hip openers activates the secondary organs of the immune system, including the spleen and the lymph nodes. Modified versions of forward bends, backbends can also be good for supporting and strengthening the body’s natural defences. It improves the flow of the sinuses and flushes out mucous from the lungs. Now that we have understood how yoga asana help in boosting immunity, let us also go through other health tips to build strong immunity.
Healthy tips other than yoga asana to boost immunity
- Drink at least 6 to 8 liters of water daily to let unnecessary toxins to wash out from your system.
- Sleep for 6 to 8 hours
- Include more green vegetables in your diet and avoid midnight munching.
- Make sure your diet is getting you your daily amount of vitamins and minerals
- Exercise and meditate regularly
Yoga asana to boost immunity
1. Tree Pose | Vriksasana
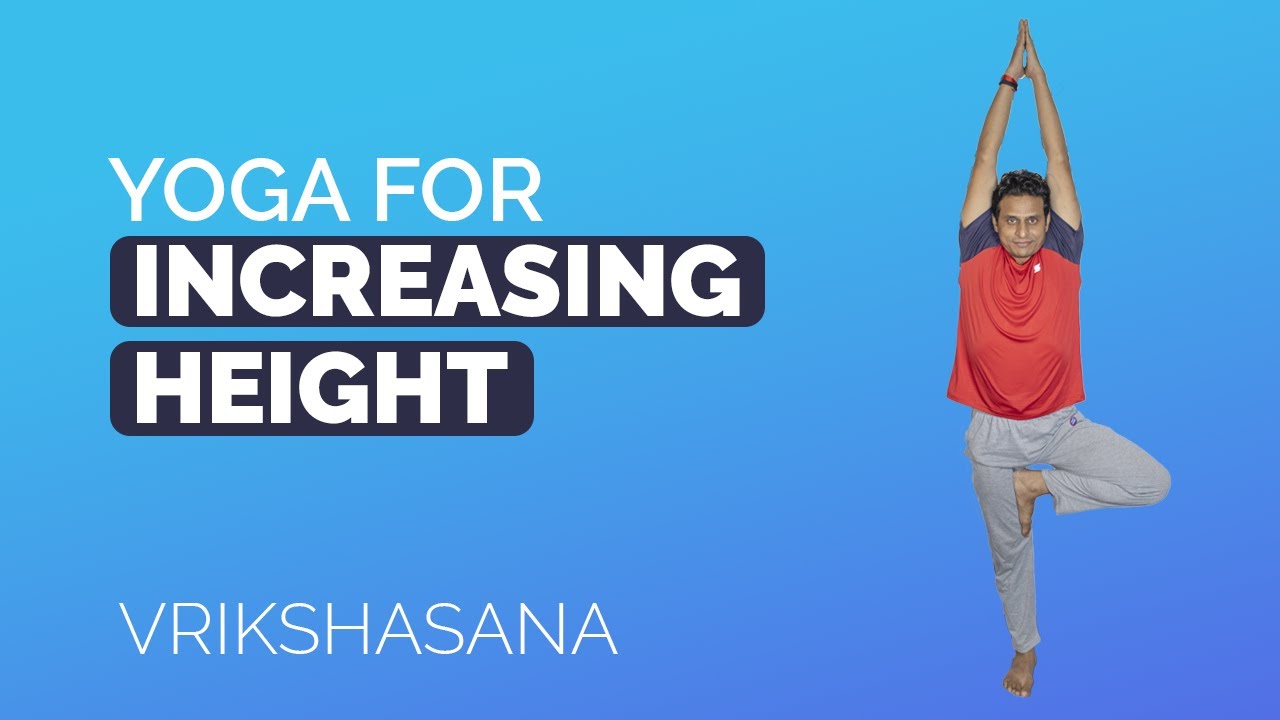
Steps:
- Stand straight with both your legs well balanced.
- Raise your feet and place it on your inner thigh of another leg, above knees.
- Your whole sole area of the raised leg should be touching the inner thigh
- Maintain a balance on one leg might be difficult, try putting a right and balanced amount of weight on the body parts.
- Raise your hands above your head and let your palm face each other, and then brought close to each other, joining.
- Maintain the balance and hold the pose as long as possible, practice it every day and try keeping a goal of maintaining the pose for 1 minute.
Precautions:
- Never place your feet exactly on the side of the knees, as the pressure would damage your knee, thus it should be always placed above knees in the inner thigh area.
- If you are suffering from high blood pressure, do not keep your hand above your head, place them near your chest.
- Avoid this pose if you are suffering from insomnia or migraine.
2. Cobra Pose | Bhujangasana

Steps:
- To begin with, first, lie down flat on your stomach.
- Place your legs comfortably and toes touching the floor and sole facing the roof.
- Then place your palm near your chest.
- Keep your elbows closely tucked inside.
- Then without moving your lower body, raise our upper body supported by your hands.
- Keep breathing normally and stay in the same position for 30 second
- Withdraw from that position, take rest, and try again for more 30 seconds.
Precaution:
- Do not practice Cobra pose, if you have any recent back or wrist injury.
- Avoid if you are pregnant.
3. Child’s Pose | Balasana
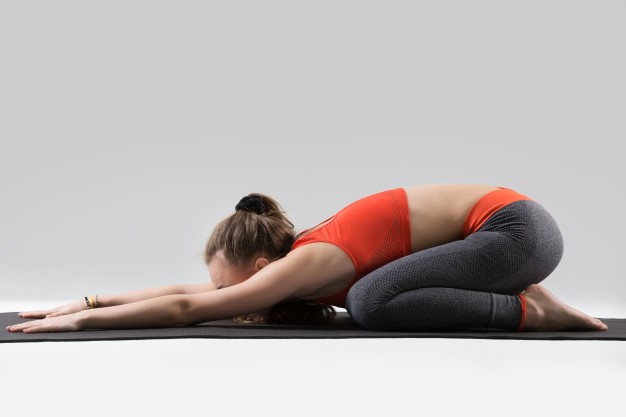
Steps:
- Kneel on your knees and keep your knees at a distance parallel to your hips.
- Bend down and let your palm touch the floor.
- Stretch your hands as much as possible.
- Let your face position itself between your hands and touch the floor.
- Now let your buttocks touch your heels slowly.
- Keep breathing slowly, focusing on your breathing.
- Stay in the same position for 30 seconds for beginners, later you can increase the time up to 2-3 minutes.
Precautions:
- Avoid this pose if you are suffering from diarrhea.
- If you are pregnant, then spread your knees wider and do not apply more pressure on the abdominal area.
- Avoid child pose if you have any knee injuries.
4. Fish Pose | Matsyasana
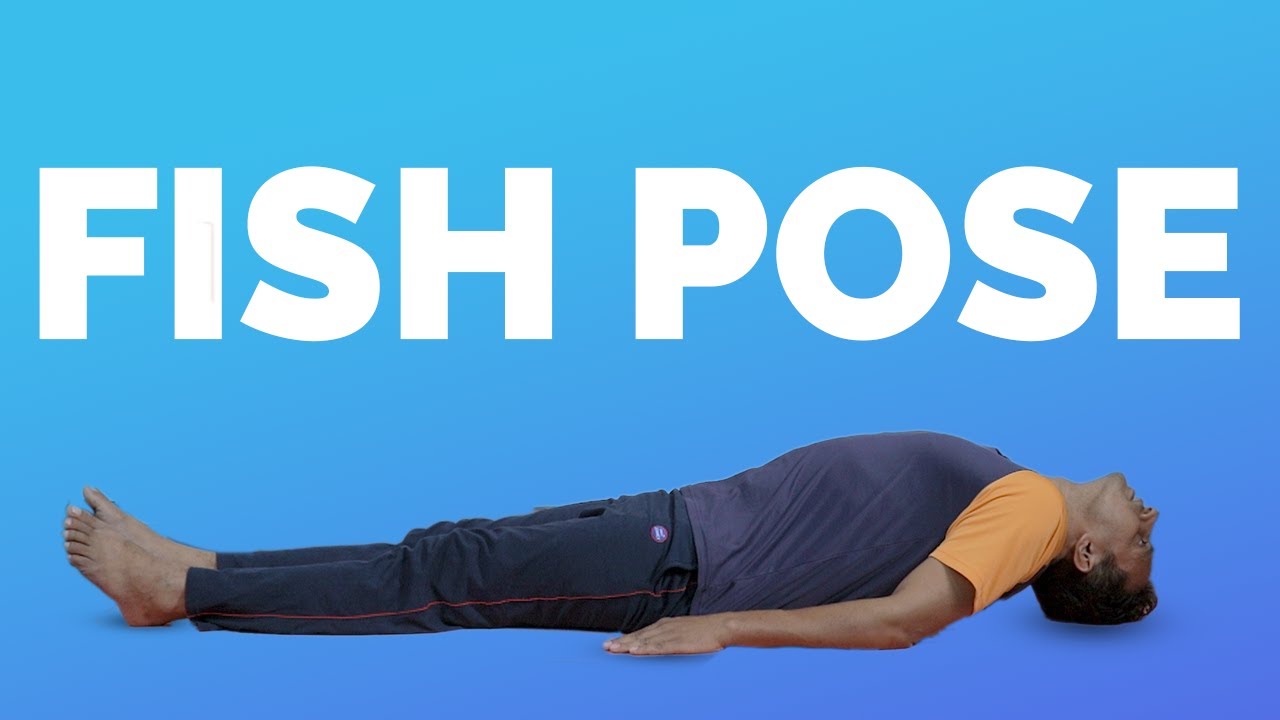
Steps:
- Roll up a blanket and then
- Lie down flat on the floor keeping the rolled blanket between your shoulders and hips
- Your head should be thrown back and it should touch the floor, hands by your side, palms up, legs straight.
- Breathe in and out gently. If you take 2 seconds to breathe in, take 4 seconds to exhale.
- Practice for 2 minutes to start with. Extend time as you go along.
Precautions:
- Avoid this asana if you are suffering from high blood pressure or low blood pressure.
- Avoid practicing this pose if you have any back or neck injury or hernia.
5. Bow Pose | Dhanurasana
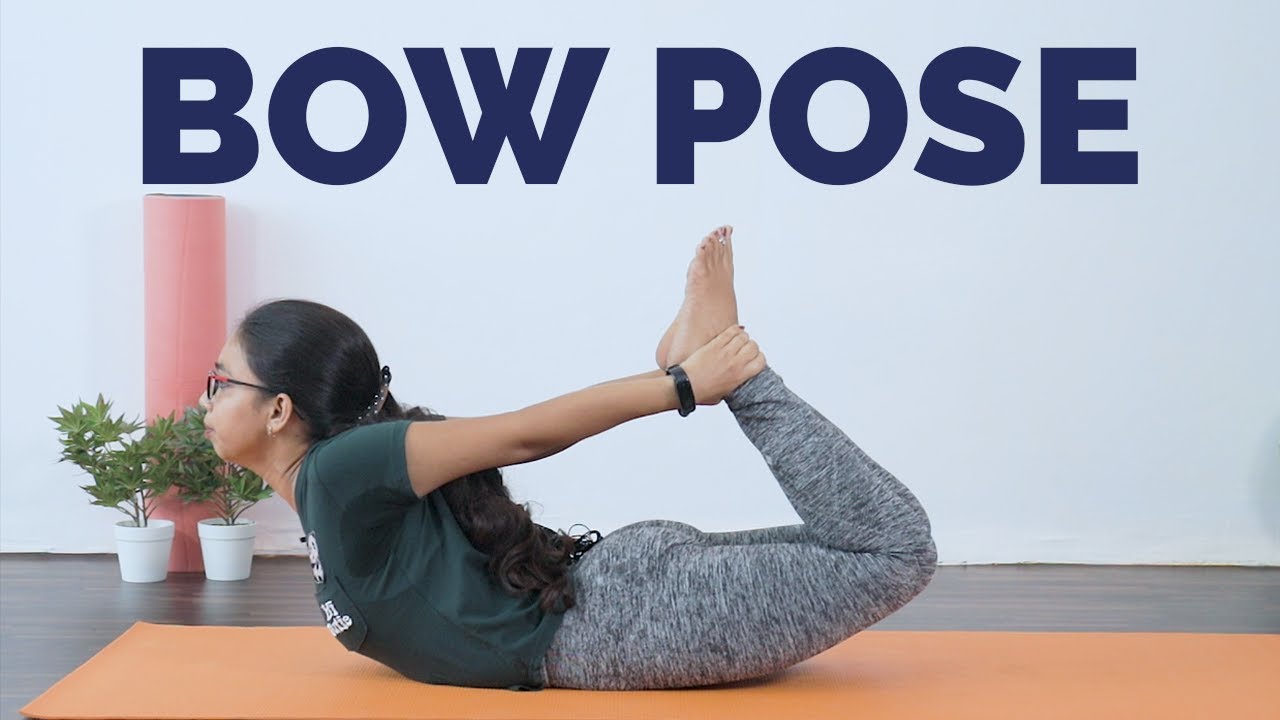
Steps:
- Lie stomach-down on the floor.
- Raise front torso, supporting weight on the stomach.
- Raise legs off the floor, fold at knees.
- Take hands back and take hold of your ankles, arching up and back as much as you can.
Precautions:
- One should not practice this right after having a meal or right before sleeping.
- Avoid this pose if you are suffering from high blood pressure or any heart problems.
6. Downward Facing Dog Pose | Adho Mukha Svanasana

Steps:
- Stand straight on your legs then bend forward.
- Place your palms on the floor, note that your fingers are widely spread and balanced.
- There should be enough space between your knees and palm.
- Now, take note that your wrists are exactly aligned with your shoulder, and knees aligned with hips.
- Stretch your elbows and let your upper back relax.
- Lift both your knees from the floor and raise your pelvis too.
- Straighten your legs gradually, as straight as possible.
- Bring your body into the shape of the alphabet ‘A’.
- Stay stable and do not change the distance between your palms and feet.
- Draw your shoulder blades into your upper back ribs and toward your tailbone.
- Hold this position for 30 seconds and later you can increase your time limit.
- To relax from that position, relax your knees and bend down.
Precautions:
- If the person practising this pose has stiff or weak back muscles, tight hamstrings, sciatica, or knee problems should practice this pose gently and gradually easing in and out of the pose while keeping the knees bent and back straight.
- Those with Carpal Tunnel Syndrome should press down into the base of their fingers.
7. Mountain Pose | Tadasana
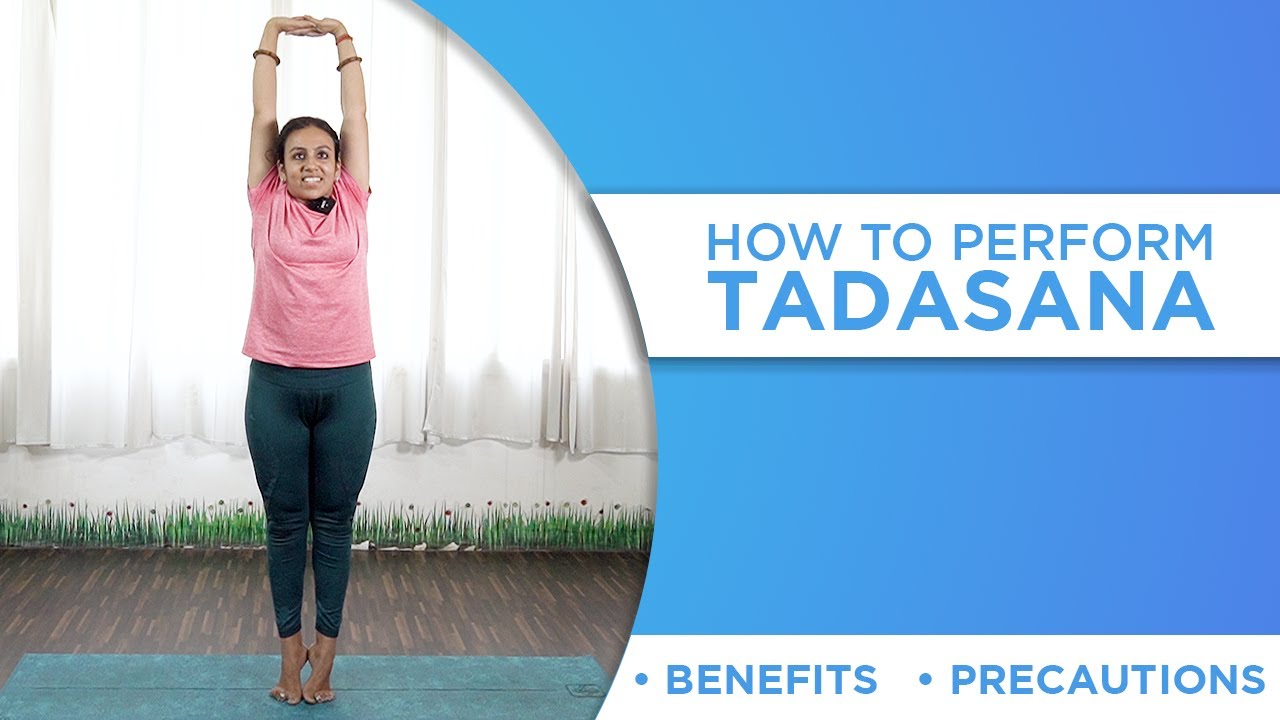
Steps:
- Stand straight on the ground and maintain distance between your feet.
- Raise both your arms together towards the sky with a deeply focused inhalation.
- Let your fingers interlock with the fingers of the other hand comfortably.
- Now raise your heals as much as possible in a way that you maintain a balance standing on your toes.
- Hold this poses as long as possible and keep inhaling and exhaling.
Precaution:
- Avoid holding this pose for too long for those suffering from Low Blood Pressure as the blood may begin to pool in the lower half of the body, causing dizziness.
- If one is pregnant it is advised to keep one-foot hip distance, or wider between your legs.
8. Raised Hands Pose | Urdhav Tadasana
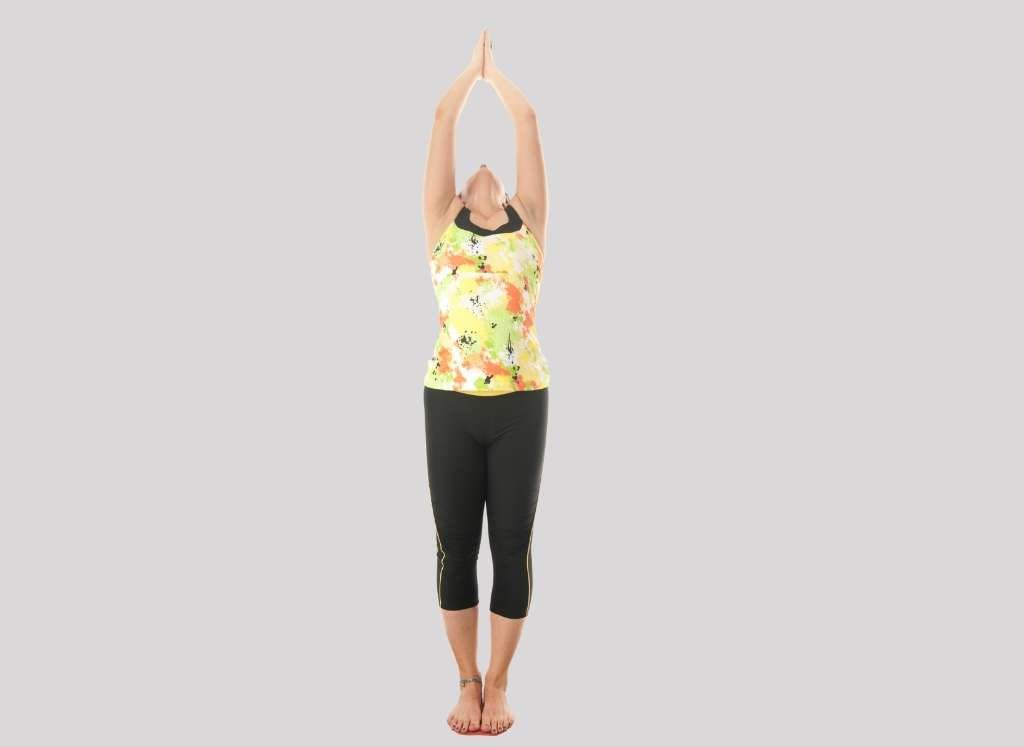
Steps:
- Stand comfortably on your feet.
- As you inhale, swing your arms out to the side and then up above your head.
- Turn your arms inwards so that your palms face each other, fingertips reaching toward the ceiling.
- Straighten your arms completely.
- Focus on your berating and hold this pose for 1-2 minutes, relax and repeat.
Precautions:
- Avoid the raised arms in this pose with shoulder or neck injuries.
9. Forward Bend | Uttanasana
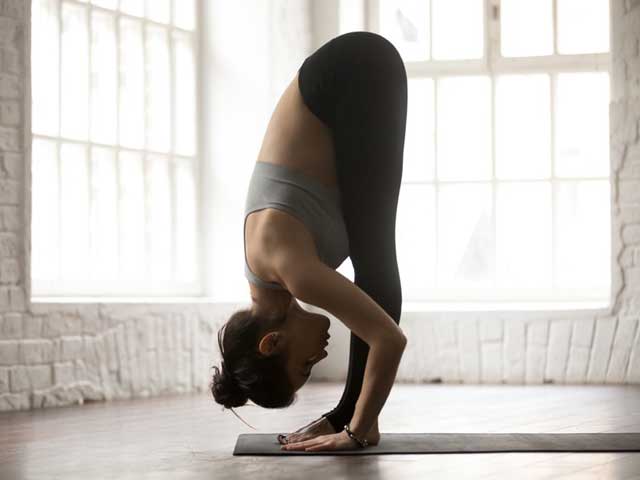
Steps:
- Stand straight on the ground and maintain distance between your feet.
- Raise both your arms together towards the sky with a deeply focused inhalation.
- Exhale and bend forward, letting your palm touch the floor.
- Your hips would act as a common point between the upper body and lower body, maintain balance.
- Feel your back stretching in opposite directions as you pull the head down and in and press the hips up.
- Breathe and hold for 4-8 breaths, pressing the belly into the thighs on the inhalation.
Precautions:
- You need to refrain from practising this pose if you face chronic problems or have a history of any injury in your knee joints, ankle joints, or back.
10. Bridge Pose | Setubandh Asana
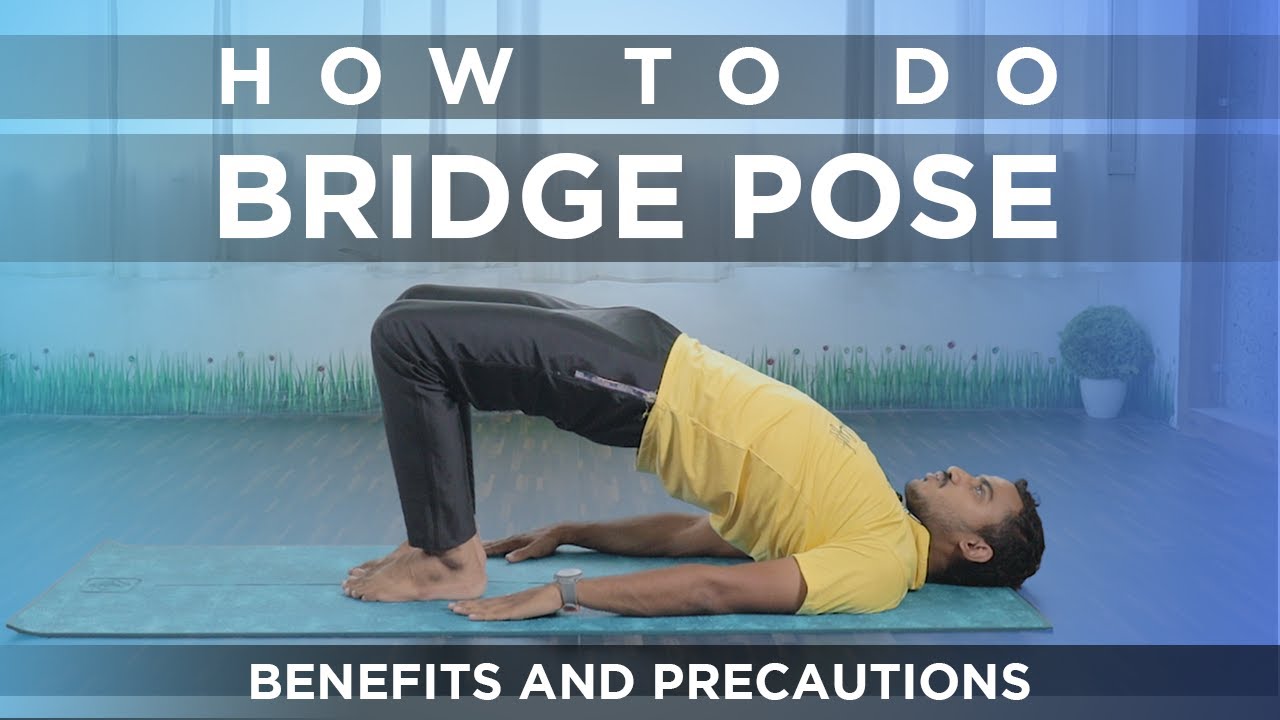
Steps:
- Lying on your back, bend both knees and place the feet flat on the floor hip-width apart.
- Place your arms alongside the body with the palms facing down.
- The fingertips should touch the heels.
- Inhale and lift the hips up, by giving a little pressure on the feet towards the floor.
- Lift your chest up with the support of your arms and shoulders.
- Please note that your shoulders and arms should be resting on the floor.
- Breathe and hold for 4-8 breaths.
- To release: exhale and gently place your spine back to the floor.
Precautions:
- Avoid practising this pose if you are suffering from neck or back pain.
- Avoid the yoga pose if one is having any knee pain.
- Avoid it during a shoulder injury.
- Avoid moving your head left or right.
- Do not put more pressure on the neck.