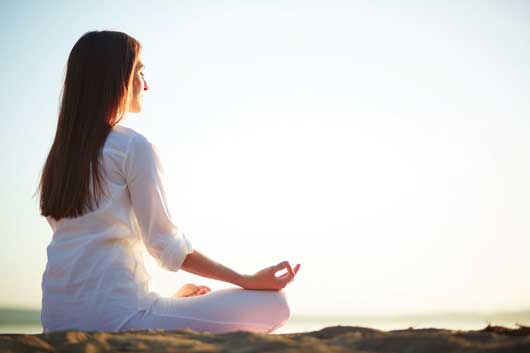
As we grow old, being mentally fit is equally important as being physically fit. Old age comes with multiple medical conditions, chronic diseases such as diabetes, hypertension, obesity, etc. In this post we will be discussing gentle yoga for senior citizens in the society that can help them in staying mentally and physically fit.
No matter how old you are, you can always rely on Yoga to remain to steer clear of all kinds of aches and pains from your body. It is a known fact that as we grow old, some of us go through muscular weakness, joint pain, backache, and other physical inconveniences. Other than these, some of us experience other health issues like hypertension, diabetes, heart-related diseases, insomnia, etc. However, the regular practice of Yoga asanas, breathing exercises aka Pranayama and Meditation can help you get rid of all sorts of bodily problems as well as help your mind be at peace.

General Diseases in Senior Citizens
- Insomnia
- Loneliness
- Hypertension
- Heart Disease
- Diabetes
- Knee Pain
- Hip Pain
- Back Pain
We would also discuss some yoga poses and therapy for overall fitness and not specific to any physical or mental issues but will surely be beneficial for overall wellness.
- Chair Yoga Poses can be done by anyone but is specially written for our loved ones who find it difficult to perform yoga asanas on the floor.
- Laughter Therapy, an exercise that has proven to be immensely helpful against loneliness, insomnia, and other psychological issues.
Yoga for Insomnia

- One of the most common sleep disorders found in seniors is Insomnia.
- Research shows that old people tend to sleep lighter and find it more difficult to maintain sleep than initiate sleep.
- With growing age, the sleep cycle is more likely to be affected leading to sleep deprivation and stress. This change may be a part of normal aging process, but it can also be a result of lifestyle habits, side effects of medications, health conditions, mental illness, and other harmful habits like smoking and alcohol.
- Apart from making several lifestyle changes, the regular practice of Yoga can help you fight Insomnia effectively. Yoga has the ability to eliminate Insomnia and other sleeping disorders and help you sleep peacefully.
- The soothing practice of Yoga has proven to be an effective sleep remedy as it lowers stress levels, calms the mind, and frees the body from all sorts of tension.
- The following yoga stretches can help you relax and allow you to enjoy a peaceful and sound sleep:
1. Alternative nostril breathing | Anulom Vilom
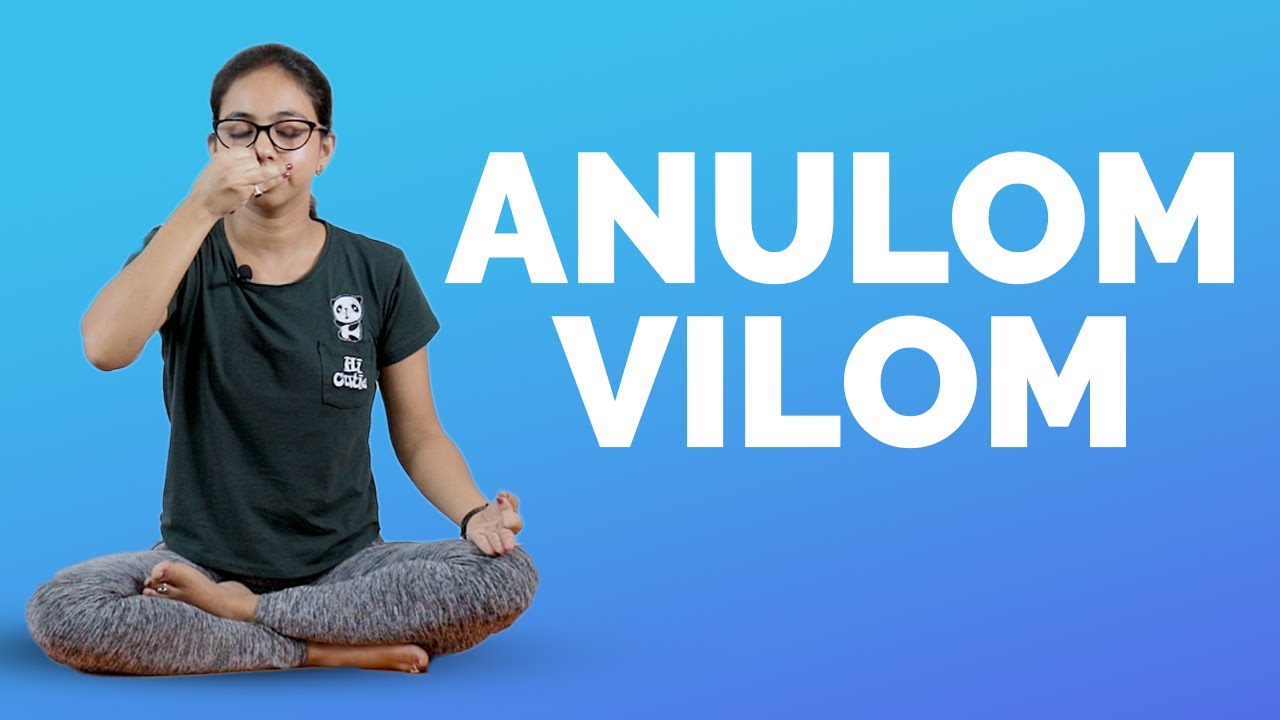
Steps:
- Sit comfortably on your mat and sit straight so that your back, neck, and head are aligned.
- Let your left-hand rest on your left knee.
- There is this particular hand pose that one has to perform with his right hand. There is a reference image. You have to curl up your index and middle finger and let the other fingers be open and not curled up.
- Maintaining the same hand pose, use your thumb to press your right nostril and inhale deeply from your left nostril.
- Hold your breath for 5 seconds and then press your left nostril with your ring finger and lift your thumb from your right nostril and exhale slowly.
- Keep repeating this 15-20 times.
Precautions:
- Avoid practicing it if you are suffering from high blood pressure or any heart disease.
2. Fish Pose | Matsyasana
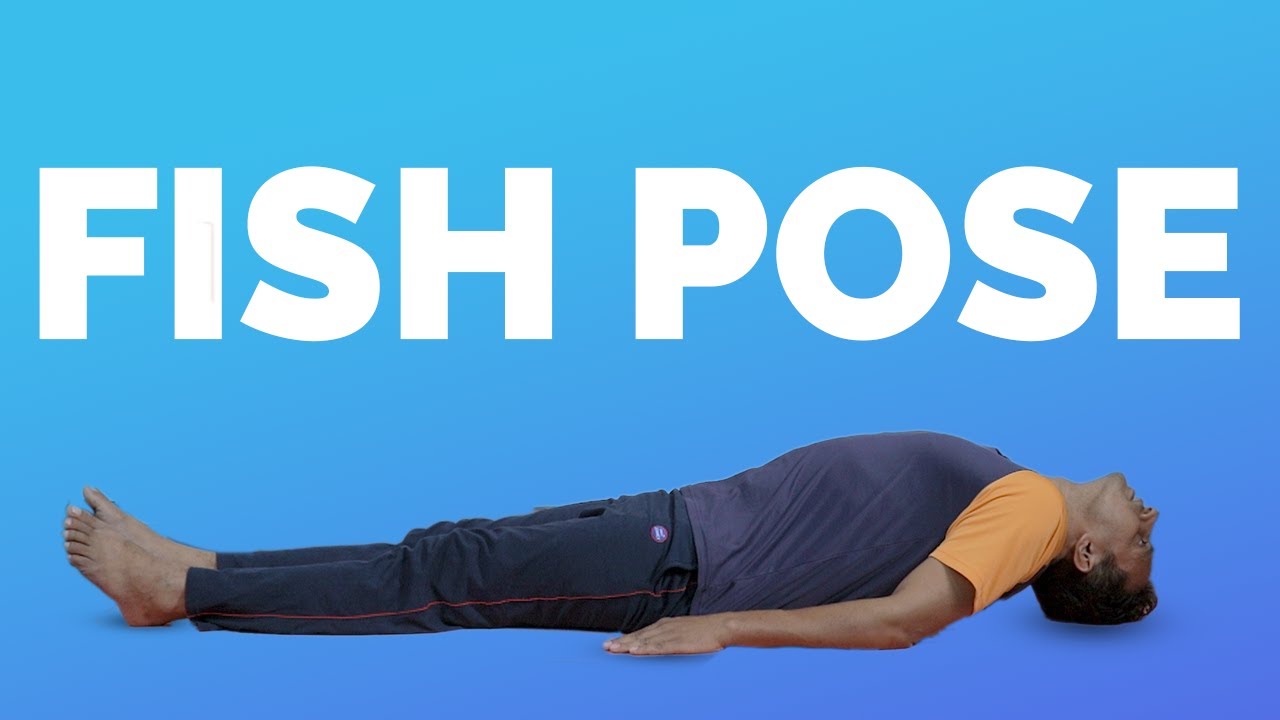
Steps:
- Roll up a blanket and then
- Lie down flat on the floor keeping the rolled blanket
- between your shoulders and hips
- Your head should be thrown back and it should touch the
- floor, hands by your side, palms up, legs straight.
- Breathe in and out gently. If you take 2 seconds to
- breathe in, take 4 seconds to exhale.
- Practice for 2 minutes to start with. Extend time as you go along.
Precautions:
- Avoid this asana if you are suffering from high blood pressure or low blood pressure.
- Avoid practicing this pose if you have any back or neck injury or hernia
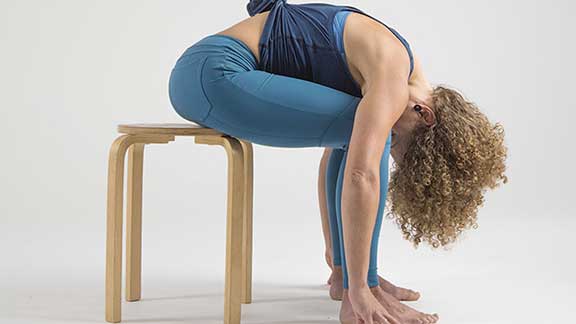
3. Child Pose | Balasana
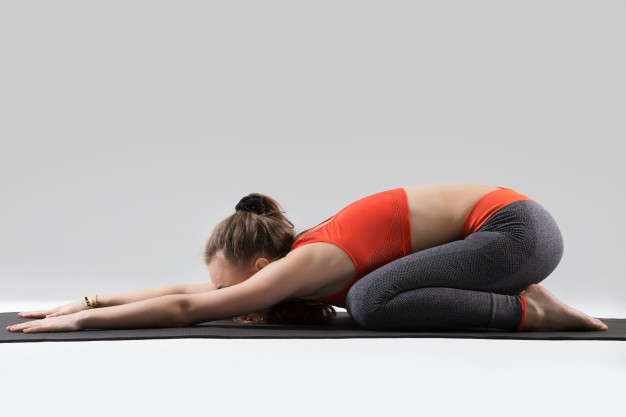
Steps:
- Sit on your knees resting your upper body on the thighs. Your feet should be lying on the floor.
- Make sure to keep your waist straight and maintain a short distance between your knees.
- Inhale and lean your upper body forward and try to rest your forehead on the floor. Use a pillow if you are unable to place your forehead comfortably on the floor.
- Stretch your arms in front of you. Your chest should touch your thighs.
- Try to lengthen your tailbone towards the pelvis.
- Now bring your arms back alongside your thighs, palms facing upwards.
- You are now in Balasana | Child pose, remain in this posture for 30 seconds to 2 minutes, and keep breathing slowly.
- Now to come back to your normal position, bring your palms under the shoulders and slowly raise your upper body. Lift your torso from the tailbone as it presses down and into the pelvis.
Precautions:
- People suffering from Diarrhea should avoid this asana.
- If you have a knee injury or joint pain, avoid this asana or practice it under expert guidance.
4. Legs up the wall pose | Viparit Asana
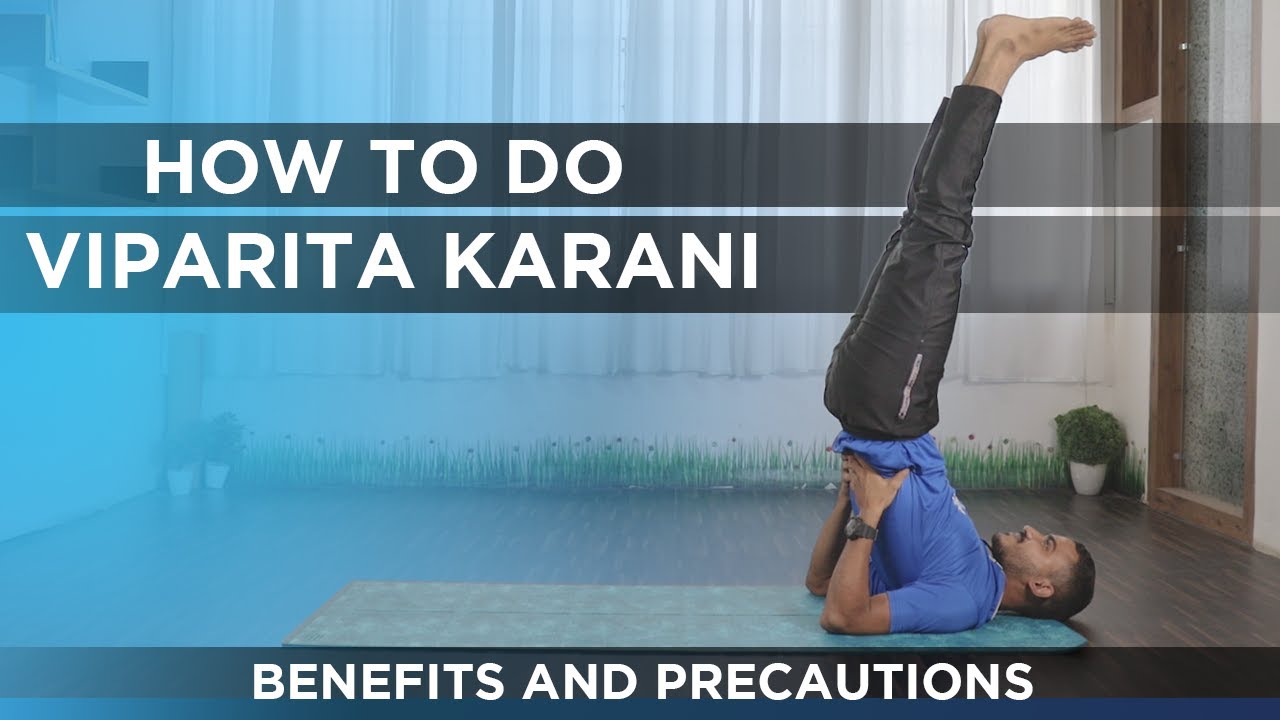
Steps:
- To perform this pose, you need to find a space near a wall.
- Sit in front of the wall and lie down and keep your knees bend.
- Keep your hands by your side and raise your legs and let it touch the wall.
- Maintain distance between your buttocks and the wall so that you can push it to stretch more.
- Make sure your back and head are resting on the floor, making a 90-degree angle.
- If needed, use your hands to support your hips and form a curve in your lower body.
- Do not put pressure on your neck.
- Close your eyes and breathe. Hold the position for at least five minutes. Relax and roll yourself on any side.
Precautions:
- To be avoided during menstruation.
- Avoid practicing this pose if you have eye problems like glaucoma.
- If you notice a tingling in your feet when you practice this pose, bend your knees and touch the soles, bringing your heels close to the pelvis.
5. Butterfly pose | Patangasana

Steps:
- Sit down with your spine erect and legs pulled out straight
- Bring both feet towards your pelvis while both your soles of feet face each other.
- Firmly, hold your feet with your hands. If needed, you may place your hands underneath feet for support.
- Make sure your feet are close to your genitals as possible.
- Start deep breathing and gently press knees and thighs towards the floor.
- Slowly start swinging your knees and thighs up and down and increase the speed at your convenience.
- Take in a deep breath and while you exhale, slowly lean forward. Try keeping your chin up and spine straight.
- Enjoy this posture, take deep breaths & make sure your knees & thighs are closer to the floor.
- Gently try to go back to normal position with legs straight and relax.
Precautions:
- People suffering from Sciatica should use a pillow to raise the hips or completely avoid this asana if too painful.
- Those suffering from groin or knee injury, make sure to out a cushion/blanket on outer thighs.
- Also if you have lower back disorders, avoid rounding up the spine by leaning forwards.
6. Meditation – Scan your body.
Steps:
- Place yourself in a relaxing position.
- In this type of meditation, one must focus on the entire body and nothing else.
- So, after settling yourself, close your eyes and breathe deeply.
- First, focus on your toes, move them a little, and focus on the toes.
- Then, observe your ankles, observe them while moving them clockwise and anti-clockwise.
- Keep breathing and gradually move up and feel your calf muscles and knees.
- Then, let your focus shift to the thighs and buttocks.
- After doing so, attend your abdominal area, observe its movement while you are breathing.
- Observe your chest and diaphragm moving while inhaling and exhaling.
- Now, focus on your shoulders and arms till your fingertips.
- Then focus on your neck for a while and then your head.
- You can repeat the same from head to toe again.
- Repeat this process until you feel better.
Yoga for Loneliness
In this fast-moving world, spending quality time with anyone has become a challenge. Regardless of any age group, everyone goes through loneliness at some point in our life, it’s okay to feel that way for some time, one needs to accept that there is no treatment which can cure loneliness as its not a disease. However, getting occupied in some meaningful activities like gardening, teaching, knitting, reading books, etc. might help. There are some poses in yoga that help to release happy hormones which uplift your mood, thus it is advised to practice these which are mentioned below.
1. Happy baby pose | Anandasana
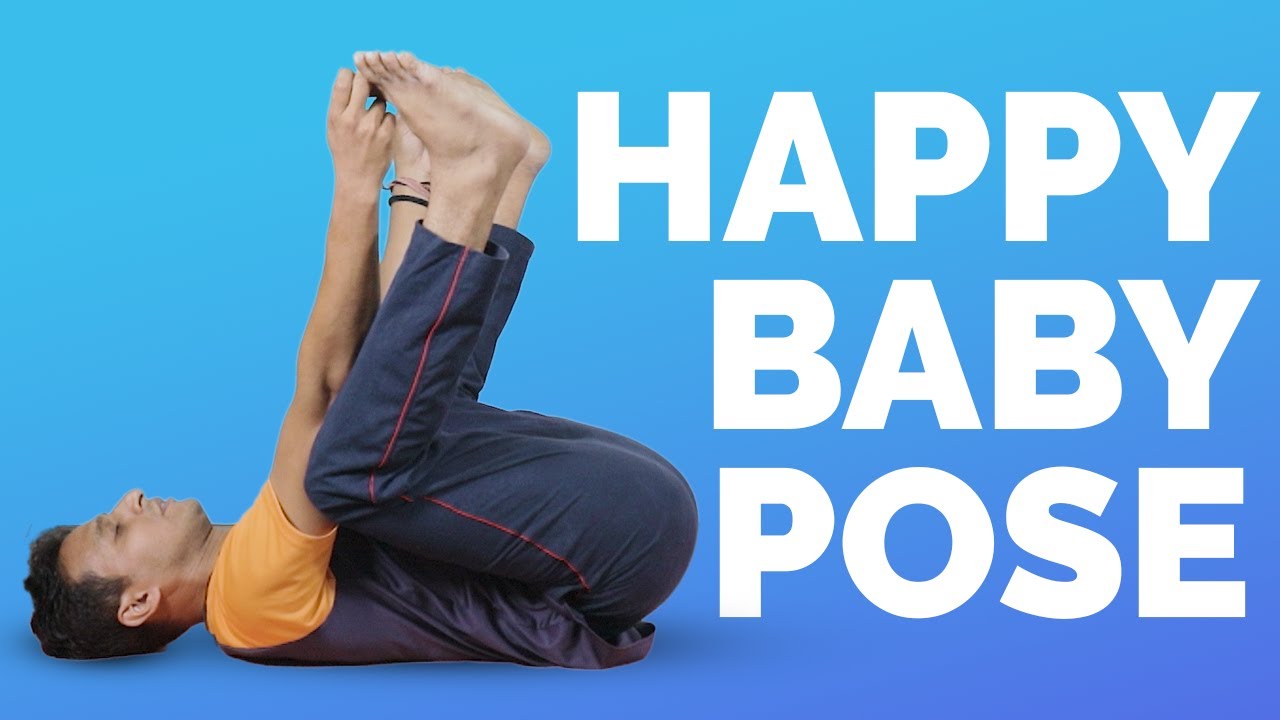
Steps:
- Lie on your back.
- Bend your knees into your belly after exhaling.
- Then inhale deeply and hold your feet with your hands.
- Open your knees slightly wider than your torso and bring them up toward your armpits.
- Keep pulling your hands down gently to create resistance.
Precaution:
- A pregnant woman should avoid this pose.
- Avoid this pose if you are suffering from any kind of knee injury or neck injury.
2. Meditation – Scan your environment
Steps:
- Sit outdoor or sit comfortably facing a window.
- Close your eyes and focus on your breathing till you feel calm and composed.
- Open your eyes and notice 5 things around you that you can see clearly.
- Notice 4 things around you that you can hear.
- Notice 3 things around you that you can feel.
- Notice 2 things around you that you can smell.
- Lastly, notice 1 thing that is around you and you remember how it tastes.
3. Breath of fire | Bhastrika Pranayama
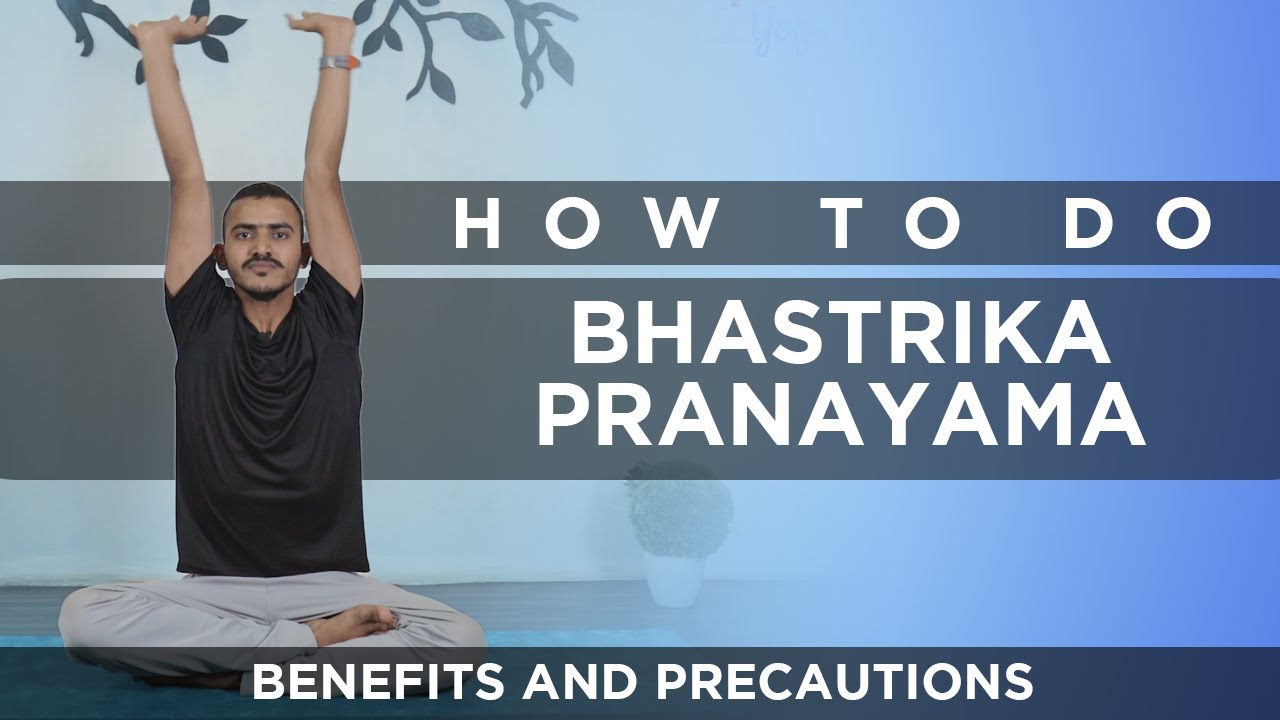
Steps:
- Sit comfortably on the mat, and fold your legs.
- Sit straight and keep your back neck and head aligned.
- Bend your elbows, placing them in front of your torso.
- When you inhale, move your elbows up and palm open and placing it near your ears.
- Hold your breath for 2-3 seconds.
- Then you exhale, and when you exhale, push your breath out and swing you elbows down and your open palm into a fist.
- Keep inhaling and exhaling for 20-25 times continuously.
Precautions:
- Avoid practicing Bhastrika Pranayama if you are suffering from high blood pressure.
- A person suffering from acute heart problems should not practice Bhastrika Pranayam.
4. Focused Meditation
Steps:
- This kind of meditation involves concentrating on something using any of the five senses.
- This meditation can be practice by anyone who needs additional focus in their life.
- First of all, place yourself comfortably.
- Then suppose you are using your eyes for this meditation, you will have to focus on any small point near you or light a candle and focus on the flame, its movement.
- If you are using your skin as one of the senses to concentrate on, then you could feel the wind or the air passing by and focus on the friction on your skin.
Yoga for Hypertension
1. Thunderbolt pose | Diamond pose | Vajrasana
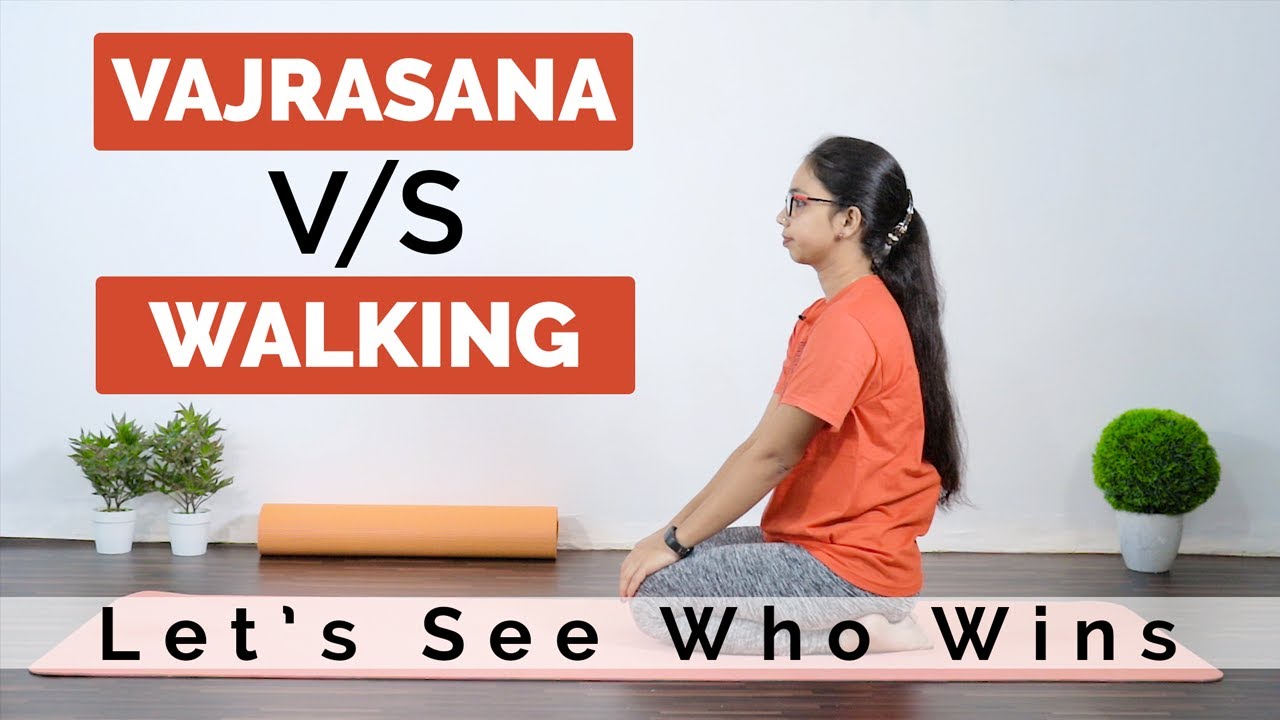
Steps:
- Sit in a position where the soles of your feet are on your buttocks.
- Place the thighs on the legs one over the other and soles on your buttocks.
- Your whole body weight should fall on your knees and ankles. Make sure your calves are touching the thighs.
- Sit straight with an erect spine and close your eyes.
- Take a deep breath and place your palms on the respective knees while you inhale and exhale.
- Hold on to this position for 3-5 minutes initially. Gradually increase the time up to 15 minutes.
Precautions:
- People suffering from joint pain should avoid this asana.
- Also, people having lower back problems and spinal problems should avoid this asana.
- Those having a hernia, intestinal ulcers, and other diseases related to small and large intestines should practice this yoga under expert guidance.
2. Child Pose | Balasana
- Refer in ‘Yoga for Insomnia’
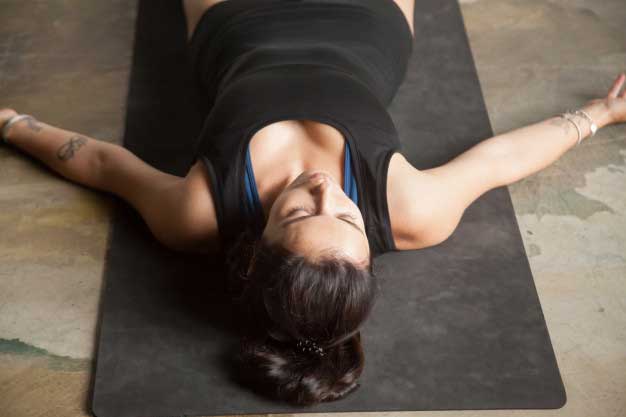
3. Corpse Pose | Shavasana
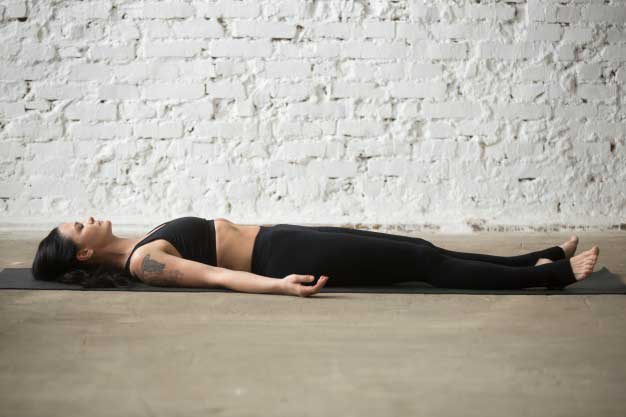
Steps:
- Lie flat on the floor keeping your back straight.
- Your palms, facing upwards, must be placed slightly apart from your body.
- Close your eyes and place your legs comfortably apart from each other. Make sure your toes are facing sidewards.
- Keeping your head and spine in a straight line, lay peacefully.
- Take a deep breath, draw attention to every part of your body.
- Breathe slowly, setting your body in a state of deep relaxation. Let it soothe your body, mind, and soul.
- Forget everything and try to focus on your body while breathing. Feel each and every breath going in and out.
- Remain in this position for a few minutes (make sure you don’t fall asleep) and slowly come back to your normal position.
Precautions:
- Avoid doing this Asana in a noisy/disturbing environment.
- Make sure not to move your body while performing this asana. You need to remain completely still as even the slightest movement may disturb your practice.
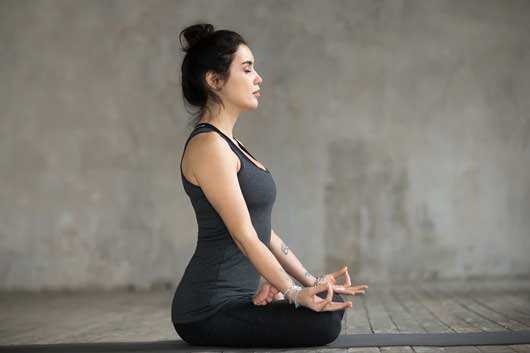
4. The Easy Pose | Sukhasana
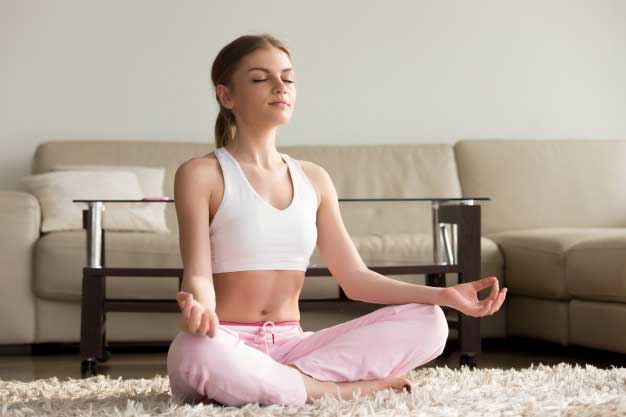
Steps:
- If you find it difficult to interlace legs and put your heels on your lap. You can simply sit cross-legged.
- Palms on knees, facing up, thumb and index finger joined at the tips in an arc, other fingers straight out.
- Keep your spine straight
- Close eyes focus on your breathing.
- Next, sit still and calm and practice gentle, deep breathing. Imagine you are in space and the energy flows in through the top of your head and into your body when you breathe in.
- Then slowly breathe out with your nostrils and making a humming while you exhale.
- Repeat this process until you find yourself calm and focused.
Precaution:
- If while practicing any of the above and if you feel uncomfortable, then take a pause and lie down for a while.
5. Breath of fire | Bhastrika Pranayama
- Refer in ‘Yoga for Loneliness’
6. Skull Shining breath | Kapalbhati
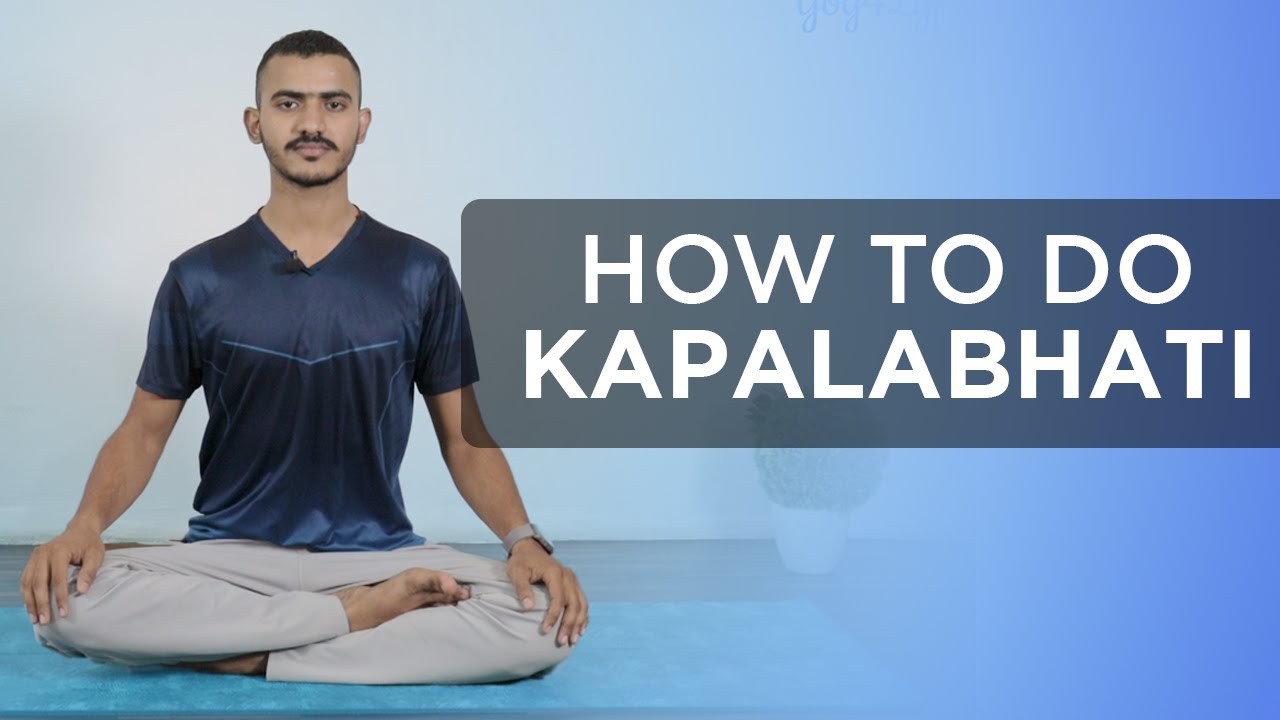
Steps:
- Sit comfortably on your mat and sit straight so that your back, neck, and head are aligned.
- Inhale normally and exhale forcefully through your nostrils only.
- Keep inhaling and exhaling in this manner for 30 -50 seconds.
Precautions:
- Avoid Kapalbhati if you are pregnant.
- Avoid if you are suffering from high blood pressure or heart-related discomforts
- Not to be practiced when having an asthma attack.
7. Humming bee | Bhramari pranayama

Steps:
- Keeping your eyes closed, sit up straight in a ventilated space.
- Breathe normally and relax your body.
- Using your thumb, plug both the ears and close your eyes. Using your middle fingers, close your eyes. Apply a little pressure on your eyes.
- Now with your nostrils, breathe in deeply and then exhale. Make the sound of a bee humming.
- Make a continuous humming sound from the throat. Feel the vibrations of this sound in your head.
Precautions:
- Do not force your breathing while performing this asana.
- Avoid in case of high blood pressure, chest pain.
- Stop and breathe normally if you start to feel dizzy while performing this exercise.
8. Alternative nostril breathing | Anulom Vilom
- Refer in ‘Yoga for Insomnia’
Yoga for Heart Disease
1. Mountain Pose | Tadasana

Steps:
- Stand straight on the ground and maintain distance between your feet.
- Raise both your arms together towards the sky with a deeply focused inhalation.
- Let your fingers interlock with the fingers of the other hand comfortably.
- Now raise your heals as much as possible in a way that you maintain a balance standing on your toes.
- Hold his poses as long as possible and keep inhaling and exhaling.
Precaution:
- Avoid holding this pose for too long for those suffering from Low Blood Pressure as the blood may begin to pool in the lower half of the body, causing dizziness.
- If one is pregnant it is advised to keep one-foot hip-distance, or wider between your legs.
2. Tree Pose | Vrikshasana
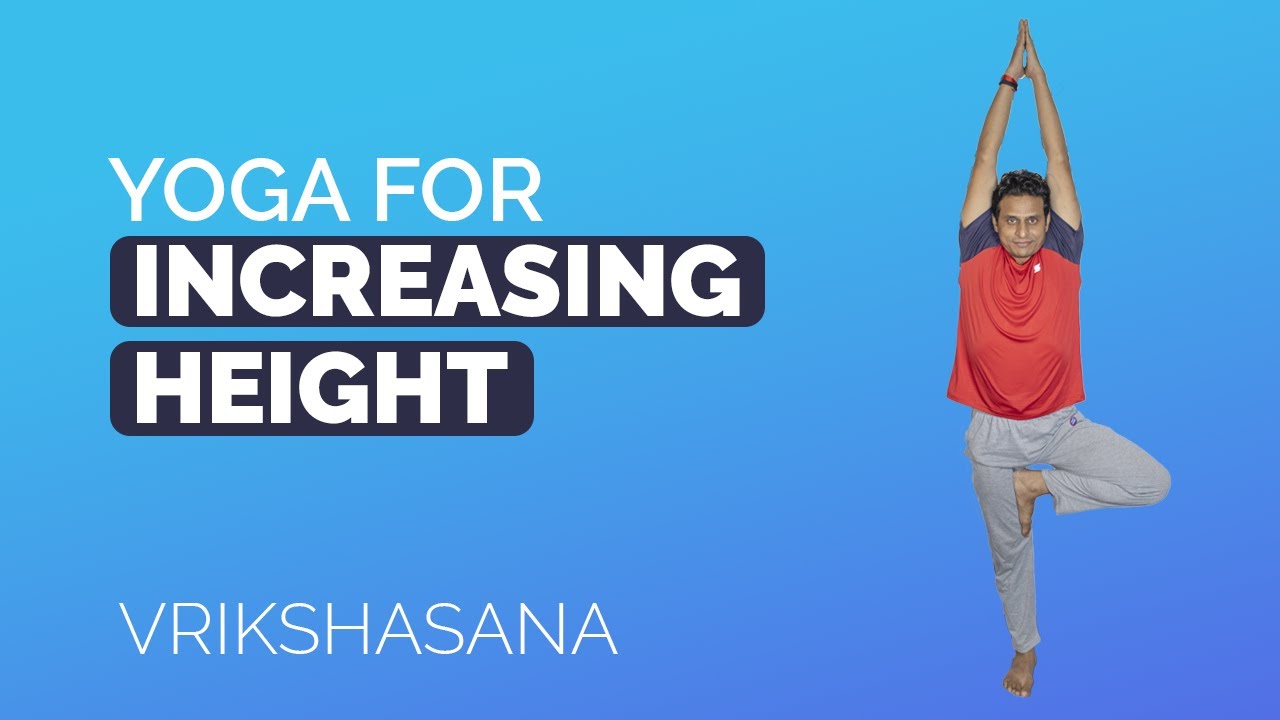
Steps:
- Stand straight with both your legs well balanced.
- Raise your feet and place it on your inner thigh of another leg, above knees.
- Your whole sole area of the raised leg should be touching the inner thigh
- Maintain a balance on one leg might be difficult, try putting a right and balanced amount of weight on the body parts.
- Raise your hands above your head and let your palm face each other, and then brought close to each other, joining.
- Maintain the balance and hold the pose as long as possible, practice it every day, and try keeping a goal of maintaining the pose for 1 minute.
Precautions:
- Never place your feet exactly on the side of the knees, as the pressure would damage your knee, thus it should be always placed above knees in the inner thigh area.
- If you are suffering from high blood pressure, do not keep your hand above your head, place them near your chest.
- Avoid this pose if you are suffering from insomnia or migraine.
3. Five-Pointed Star Pose | Utthita Hasta Padasana
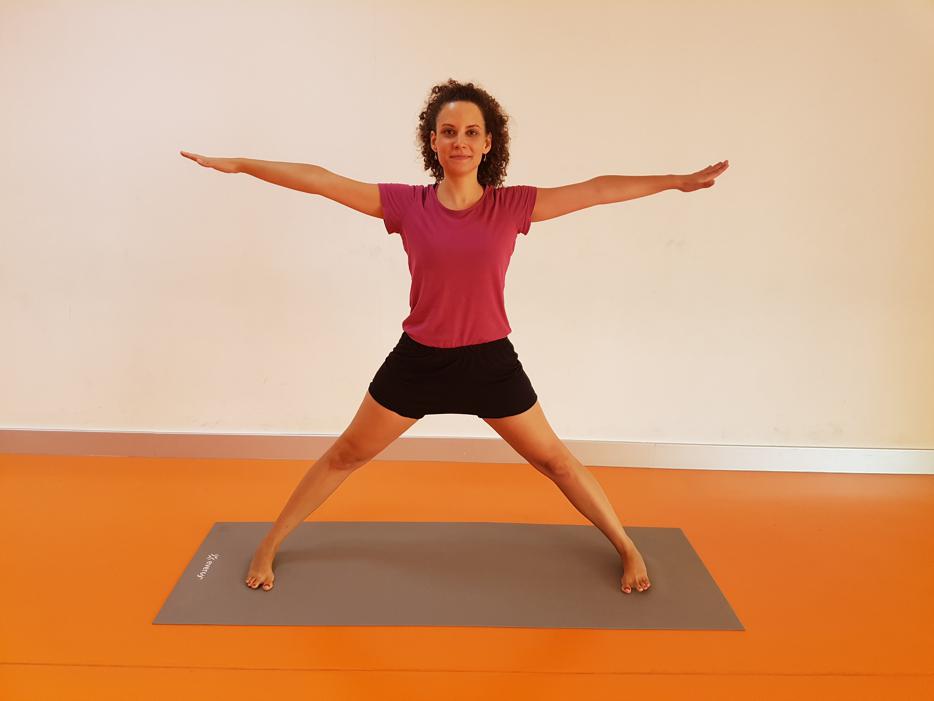
Steps:
- Stand straight on your mat (Tadasana). Join your feet and stand evenly on both feet.
- Bring both your hands in front of your chest in a way that the middle finger slightly touching each other.
- Breathe in, step both your legs apart with a slight jump. Extend your arms outwards at shoulder height.
- While you are in this pose, press the inner and outer edges of the foot evenly.
- Lower your shoulders and stretch out your arms as wider as you can.
- Keep breathing in this position for a few minutes.
- Now to come back, bring the feet back together with a slight jump, join the palms in front of your chest.
- And then slowly bring your arms back to the sides as if you are in Tadasana.
Precautions:
- If you have knee pain, avoid jumping. You can simply spread your legs a little wider than your shoulders.
- Anyone suffering from Migraine should avoid holding this pose longer.
- Avoid practicing this asana if you are suffering from Arthritis.
4. Cat-Cow pose
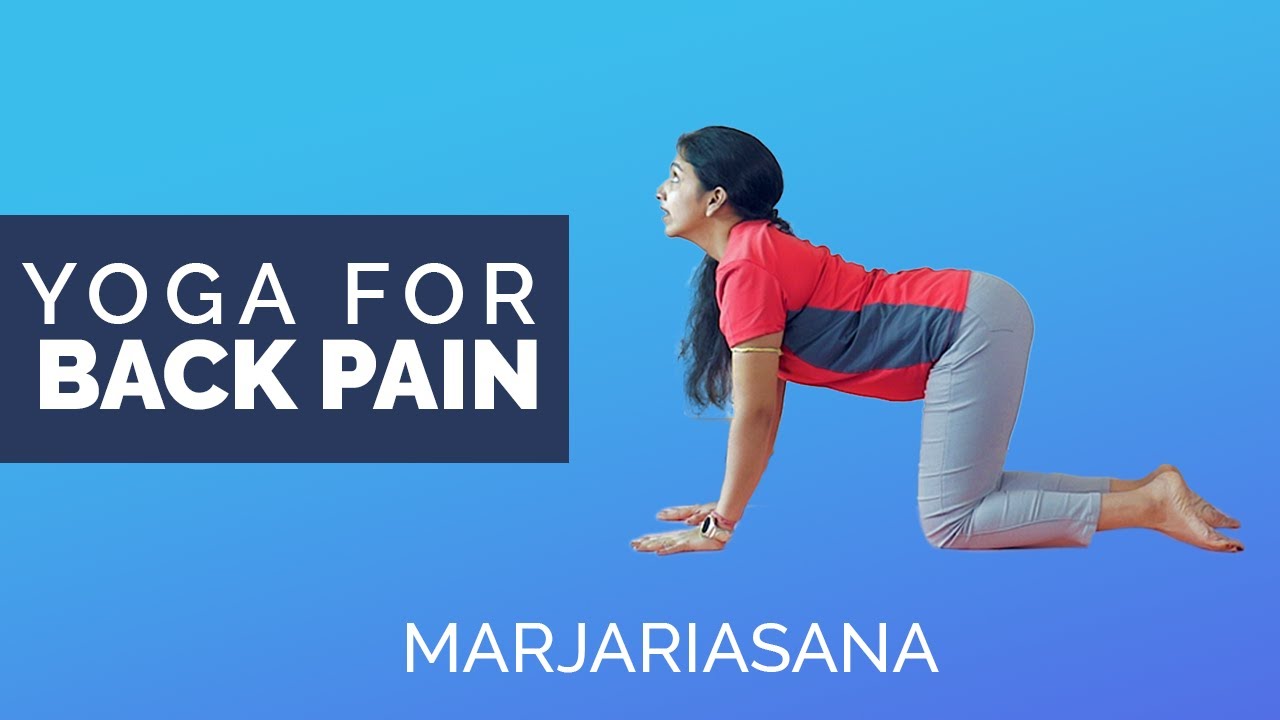
Steps:
- First, come to a position same as a baby crawling, that would be palms on the floor and knees on the floor.
- Be in a neutral position with your head and neck and spine aligned.
- Then we will begin with Cow Pose, so inhale when you drop your belly towards the mat. Lift your chin and chest, and gaze up toward the ceiling.
- Then, we will move to Cat Pose, you exhale and push your belly to your spine and round your back toward the ceiling. The pose should look like a cat stretching its back.
- Inhale, coming back into Cow Pose, and then exhale as you return to Cat Pose.
- Repeat 5-20 times and rest.
Precautions:
- Avoid this pose if you have any knee injury.
- A pregnant woman should also avoid this pose and it might stress the belly or practice it when supervised.
Yoga for Diabetes
1. Lying Spinal Twist
Steps:
- Lie down gently on your back.
- Bend your knees and bring your feet towards your hip. Make sure the sole of your feet is resting flat on the floor.
- Interlock your fingers and place your palm under the back of your head. Push your elbows towards the floor as much as you can.
- Take a deep breath and turn both your legs on the right side. Try to touch your right thigh to the floor.
- Hold your breath for 3-5 seconds and inhale while you bring your knees right back to the center.
- Lower your knees & gently bring back your hands to the side of your body to release this position.
Precautions:
- Those having any kind of hip, knee, or spine injury should avoid this asana.
2. Legs up the wall pose | Viparit Asana
- Refer in ‘Yoga for Insomnia’
3. Cobra Pose | Bhujangasana

Steps:
- To begin with, first, lie down flat on your stomach.
- Place your legs comfortably and toes touching the floor and sole facing the roof.
- Then place your palm near your chest,
- Keep your elbows closely tucked inside.
- Then without moving your lower body, raise our upper body supported by your hands.
- Keep breathing normally and stay in the same position for 30 second
- Withdraw from that position, take rest, and try again for more than 30 seconds.
Precaution:
- Do not practice Cobra pose, if you have any recent back or wrist injury.
- Avoid if you are pregnant.
4. Corpse Pose | Shavasana
- Refer in ‘Yoga for Hypertension’
Yoga for Knee Pain
1. Hero Pose | Virasana
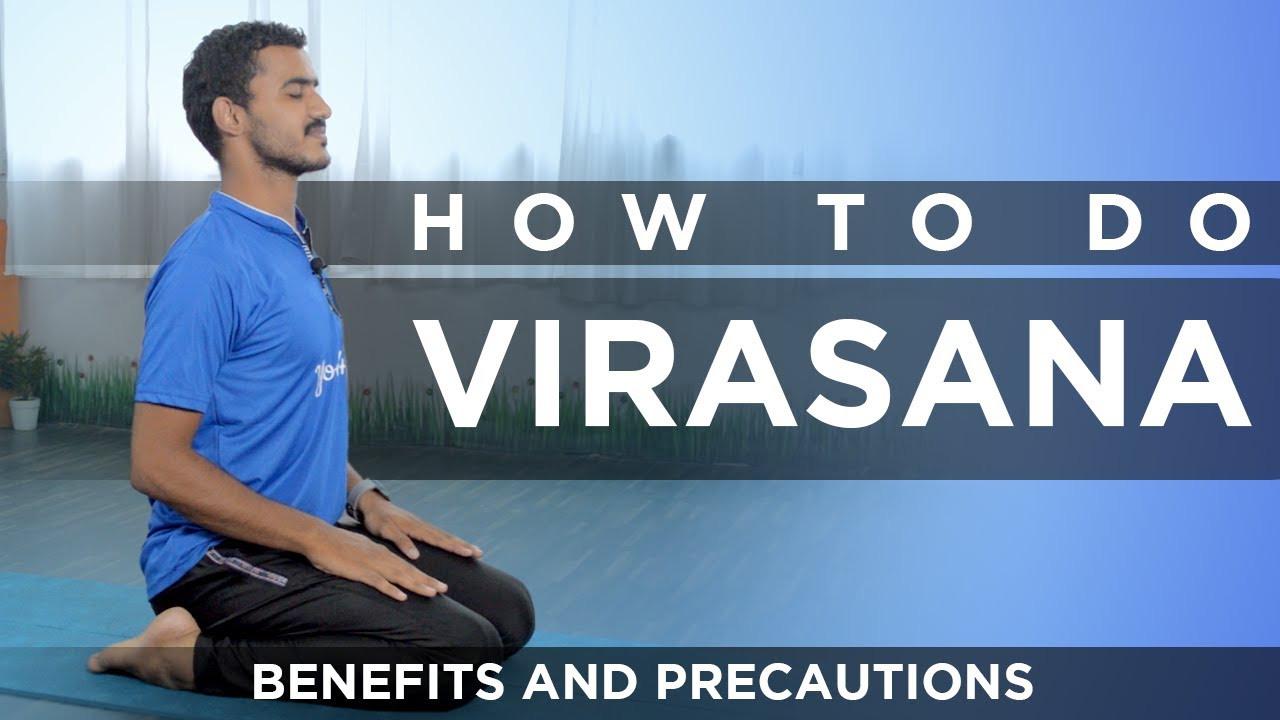
Steps:
- At first, sit on the floor or the Yoga mat in kneeling position (Refer Vajrasana).
- Maintain some distance between your feet. It should be slightly more than the width of your hips.
- Keep both your knees under your buttocks.
- Place your hands on your thighs.
- Take a deep breath and lower your buttock to sit on the floor between your feet. You might have to roll your calf muscles to make this happen.
- Make sure your toes are not tucked under your hips. You should be seated right between your feet.
- See that your toes are pointed backward.
- Remain in this posture for 30 seconds to one minute.
- To release, press your palms into the floor and lift your buttocks slowly. Cross your ankles beneath your body and extend your legs forward.
Precautions:
- Stop continuing this asana if you find sharp, twitching sensations or pull in your calves or knees.
- If you have knee pain, you can sit on a block and not on the floor directly.
- Do not push your body. Only practice this asana if completely comfortable.
2. Garland Pose | Malasana
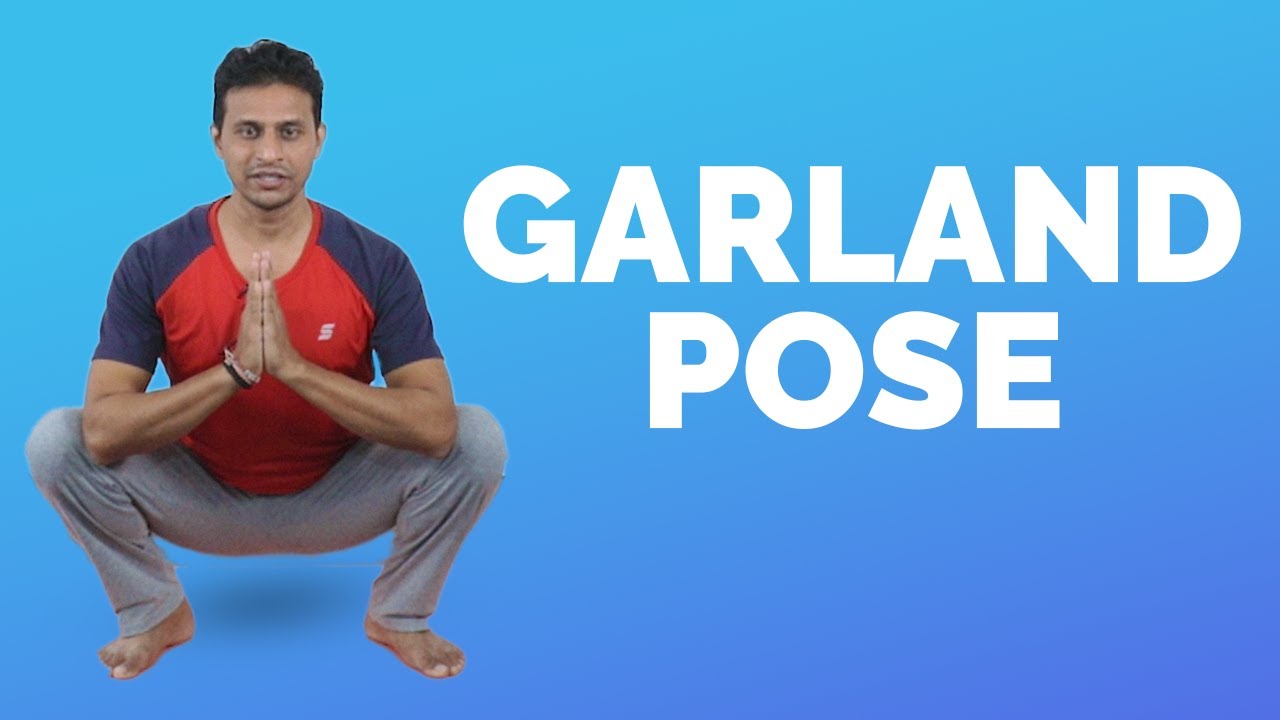
Steps:
- Stand straight in Tadasana. Spread your feet slightly wider than the width of your hip.
- Exhale and lower your hips. Keep lowering your hips until they are few inches above the floor.
- Take a deep breath. Spread out your knees and thighs.
- Lean your torso forwards, a little between your thighs and knees.
- Bring your hands in front of your chest and form “Namaste pose (Anjali Mudra)”.
- While you are at it, try to press your triceps against your inner thighs.
- Close your eyes. Hold this pose for 30 seconds to one minute at your convenience.
- To get back, inhale and stand slowly to your normal position.
Precautions:
- Avoid this asana if you have an injury in the knee, back, or ankle.
- It is essential to perform this asana in an empty stomach. Try doing it in the early morning or 4 hours after a meal.
- Instead of putting your whole weight on your heels, try spreading the whole body weight evenly throughout the whole feet.
- Do not perform this asana immediately after running.
3. Crocodile Pose | Makarasana
Steps:
- To begin with, lie down on your stomach. Use a mat if possible.
- Stretch your hands forward.
- Inhale and raise your upper body. Place your chin on your palms. Elbows should be on the floor with a little gap between them.
- Close your eyes & keep breathing deeply.
- Hold on to this posture for a few minutes at your convenience.
- Open your eyes while exhaling.
- To release the pose, ease out your palms and bring your shoulders and chin on the ground.
Precautions:
- Although this is an easy asana, if you are suffering from serious back pain, neck pain, or back injuries, avoid practicing this asana.
4. Extended triangle pose | Trikonasana

Steps:
- Stand on your mat with your feet apart. (4-5 feet)
- Keep your heels are aligned with each other.
- Turn your right foot out 90 degrees.
- Raise your arms to the side of your shoulder, and parallel to the ground with your palm facing down.
- Exhale and position your right hand in the same direction as your right foot. Shift your left hip back so your tailbone and pelvis tilt toward the wall or space behind your left foot.
- Turn your left palm forward, with your fingertips towards the sky.
- Rest your right hand near your ankle. Align your shoulders so your left shoulder is directly above your right shoulder.
- Hold this position for 1 minute, take rest and so the same with your left leg turning to 90 degrees this time and repeat the above-mentioned steps with your left hand.
Precautions:
- Avoid practicing this pose if you are suffering from high blood pressure or headache.
5. Eagle Pose | Garudasana
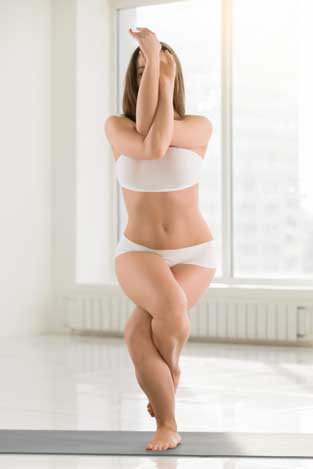
Steps:
- Begin this asana by standing in Tadasana.
- Slightly bend your knees, lift your left leg and cross it over the right thigh balancing your body.
- Now bring your arms forwards keeping them parallel to the floor. Palms should face the ceiling.
- Bend the elbows, wrap your left arm around the right arm. You can rest your left hand’s fingers firmly on the right hand.
- Make sure your spine is erect.
- Lift the elbows to the height of your shoulders.
- Gaze at a fixed point, deep breath, and hold on to this position for a couple of breaths.
- Slowly release your arms followed by your legs and come back in starting position.
- Take deep breaths and repeat on the other side.
Precautions:
- Third-trimester pregnancy shouldn’t practice this asana.
- Avoid this asana if you have recent knee, ankle or shoulder injury.
- If you have frequent headaches, high or low blood pressure, asthma or obesity, choose to avoid Eagle pose.
6. Warrior 1 | Virabhadrasana 1
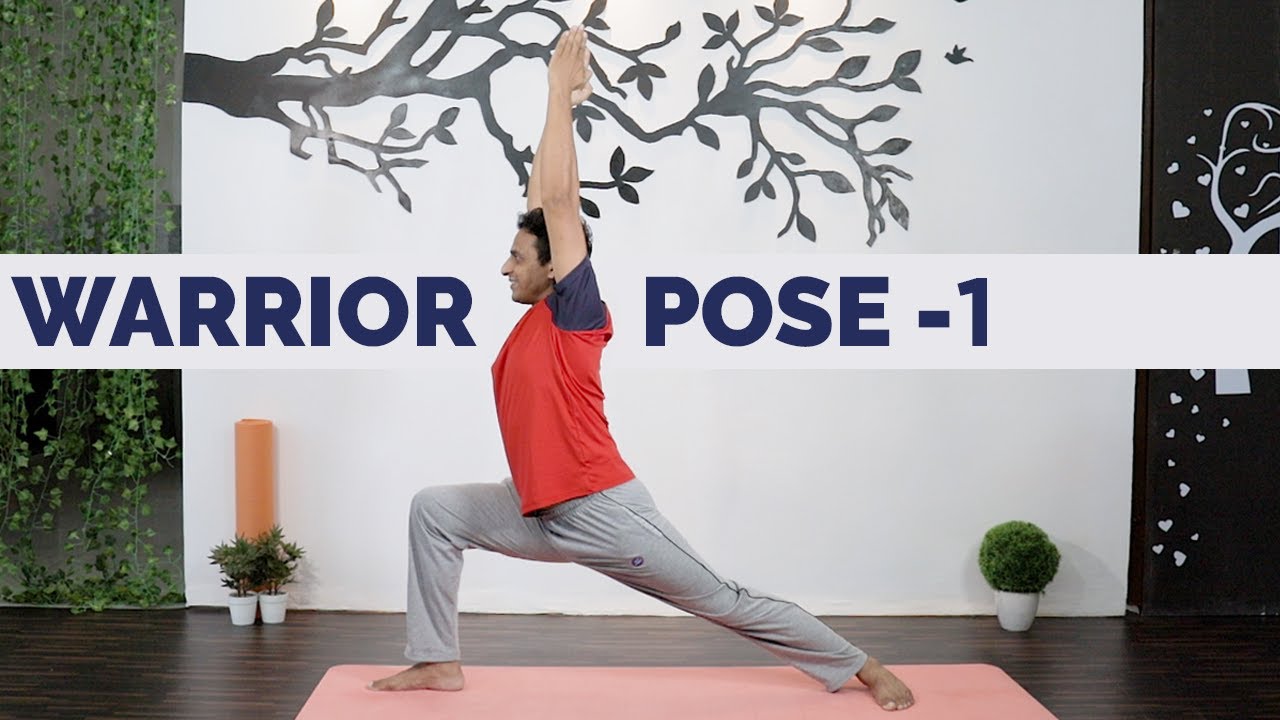
Steps:
- Stand straight and keep a 3ft distance between your legs.
- Turn your right leg to 90-degree angle and the left leg be kept in a comfortable angle
- Then turn your upper body to your right side and bend a little, folding your right leg and left leg straight.
- Raise your hands above your head and hold the pose for 30 seconds
- Repeat the same on the other side too
- You can gradually increase the time of holding the pose can repeat the same after taking some rest.
Precautions:
- Avoid this pose if you are suffering from high blood pressure and any heart problems.
- Avoid this pose if you recently suffered from Diarrhoea.
- Use some support if you have any knee-related issues, like any kind of injury or arthritis.
7. Warrior pose 2 | Virabhadrasana 2
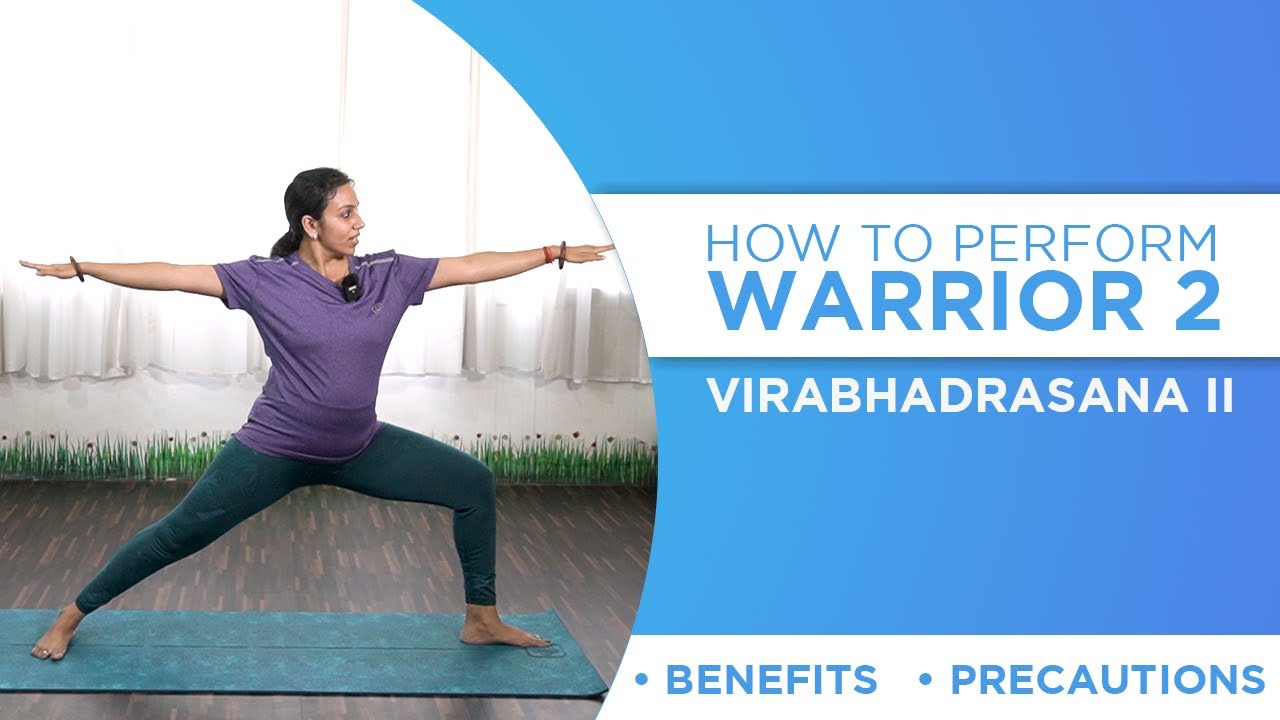
Steps:
- Stand straight and keep 3 ft. distance between your legs.
- Turn your right leg to 90-degree angle and the left leg be kept in a comfortable angle
- Then turn your upper body to your right side and bend a little, folding your right leg and left leg straight.
- Raise your hands by your side and hold the pose for 30 seconds
- Repeat the same on the other side too
- You can gradually increase the time of holding the pose can repeat the same after taking some rest.
Precautions: (same as warrior pose 1)
- Avoid this pose if you are suffering from high blood pressure and any heart problems.
- Avoid this pose if you recently suffered from Diarrhea.
- Use some support if you have any knee-related issues, like any kind of injury or arthritis.
8. King Arthur’s Pose
Steps:
- You will need a tightly rolled yoga mat, a blanket, or thin foam before we begin this pose.
- Begin by sitting on knees and refer hands (tabletop position) facing away from a wall
- See that your toes are tucked under and the soles of the feet touching the wall.
- Bend the right foot forwards your right hip and bring your right knee to the base of the wall where the wall meets the floor.
- You can place a folded blanket under your right knee if needed.
- Slide your right shin and top of the foot vertically up the wall. See that your toes are pointing straight up.
- You can place a second cushion between the wall and the top of your foot.
- Now step your left foot out onto the floor, stacking the ankle directly under the knee at 90 degrees.
- Inhale, lengthen the torso and find a neutral pelvis.
- Use your pelvis to lift your torso off your left thigh while pressing the top of the right foot into the wall and keeping the weight in the left heel.
- Keep breathing slowly and continue to lengthen the torso. Relax into the sensations into the thigh.
- Hold this posture for 10-15 breaths.
- To come out of the pose, bring your hands down to the floor and take your right shin off the wall.
- Repeat the same for the other side.
Precautions:
- This asana is an intermediate level asana. If you are new to yoga, practice this asana under supervision.
- Avoid this asana if you are suffering from knee or back pain.
9. Banana Pose | Bananasana

Steps:
- Lie straight on your back with legs joined together.
- Reach your arms overhead and clasp your hands.
- Inhale and keeping your hips firm, move your upper body and legs to your right side. Form an arch like a banana.
- You can spiral your right ankle to the left ankle to deepen the strength of your stretch.
- Be careful not to twist your hips. Stretch according to your comfort.
- Hold this pose and take a few deep breaths.
- Slowly return back to the center while inhaling.
- Repeat this asana for the other side.
Precautions:
- Avoid this Asana if you have back injuries.
- If you face tingling sensations in arms, you can place a bolster under your arm or try holding your elbows instead of your wrists.
Yoga for Hip Pain
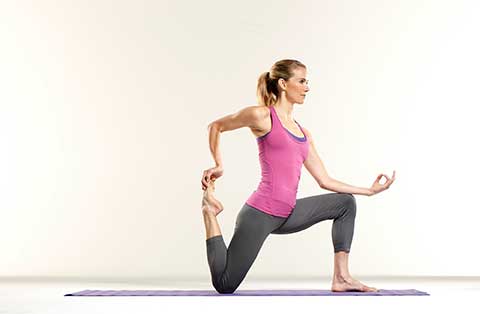
1. Low Lunge Pose – Anjaneyasana

Steps:
- Start this asana by Downward-facing dog pose (Adho Mukha Svanasana).
- Breathe out and bring your right foot forward beside your right hand.
- Make sure your right knee and ankle are parallel to each other.
- Gently lower down your left knee and place it on the floor right behind the hips. Your left foot should be resting on the floor completely.
- Breathe in and lift your torso up. Simultaneously raise your arms above your head in a way that your shoulders are touching your ears.
- Make a ‘Namaskar’ gesture by combining your arms.
- Look up and bend your head slightly backwar.
- Exhale, relax your hips, and hold on to this pose for 15-20 seconds depending the feeling of stretch within the frontal region of your legs.
- To release this pose, place your hands back to the floor and get back into the Downward-facing dog pose.
- Repeat this with your left foot.
Precautions:
- Do not perform this asana if you have high blood pressure.
- If you have shoulder problems, practice it by keeping hands on your thighs.
- Avoid this asana in case of any knee or hip injury.
2. Happy baby pose | Anandasana
- Refer in ‘Yoga for Loneliness’
3. Half Spinal Twist Pose| Ardha Matseyandra Asana
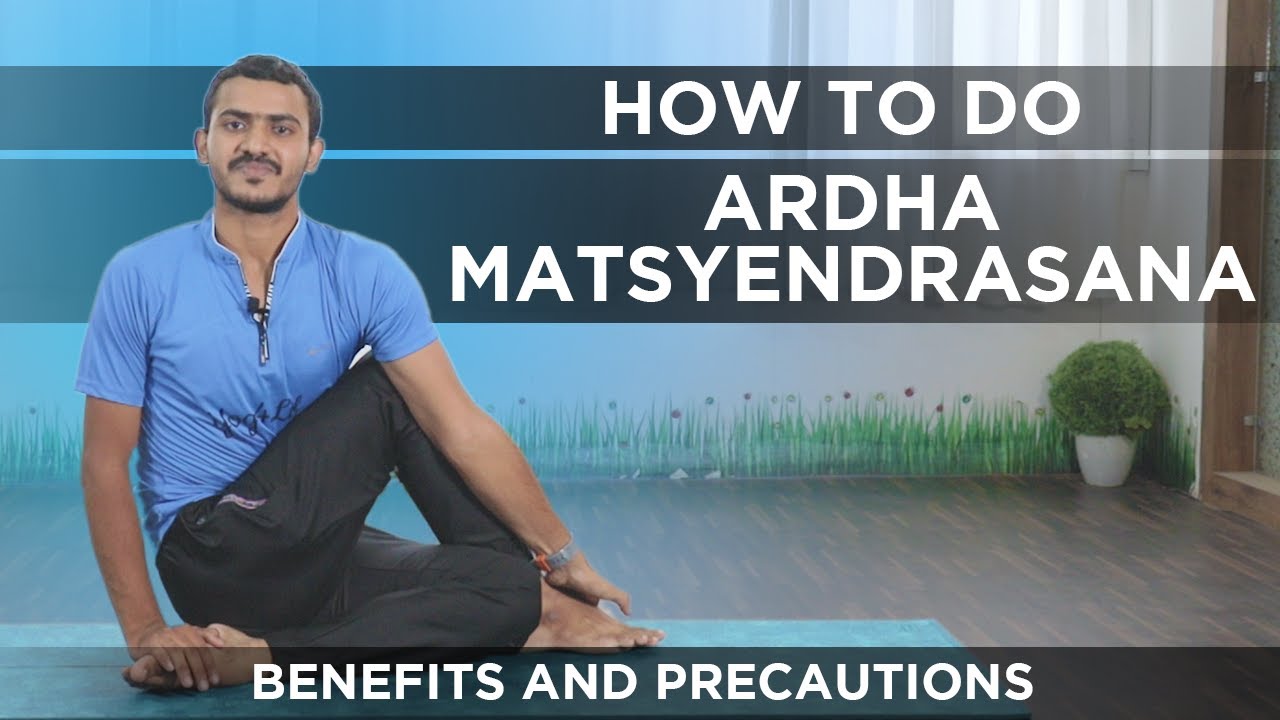
Steps:
- Sit comfortably on your mat and sit straight so that your back, neck, and head are aligned.
- Take support of your hands, and bend your right knee and place it on the left side of your left hip.
- Now twist your hips and shoulders to your right.
- Place your left elbow near your right knee while the right hand is supporting your back to be straight and balancing the pose.
- Hold it for 5-6 breaths and relax
- Repeat the same with the other leg.
Precautions:
- Avoid this pose if you are pregnant or going through menstrual cramps.
- Avoid it if you have gone through recent brain, abdominal or heart surgery.
- If you had a spinal disc slip, then practice it under supervision.
4. Cow Face Pose | Gomukhasana
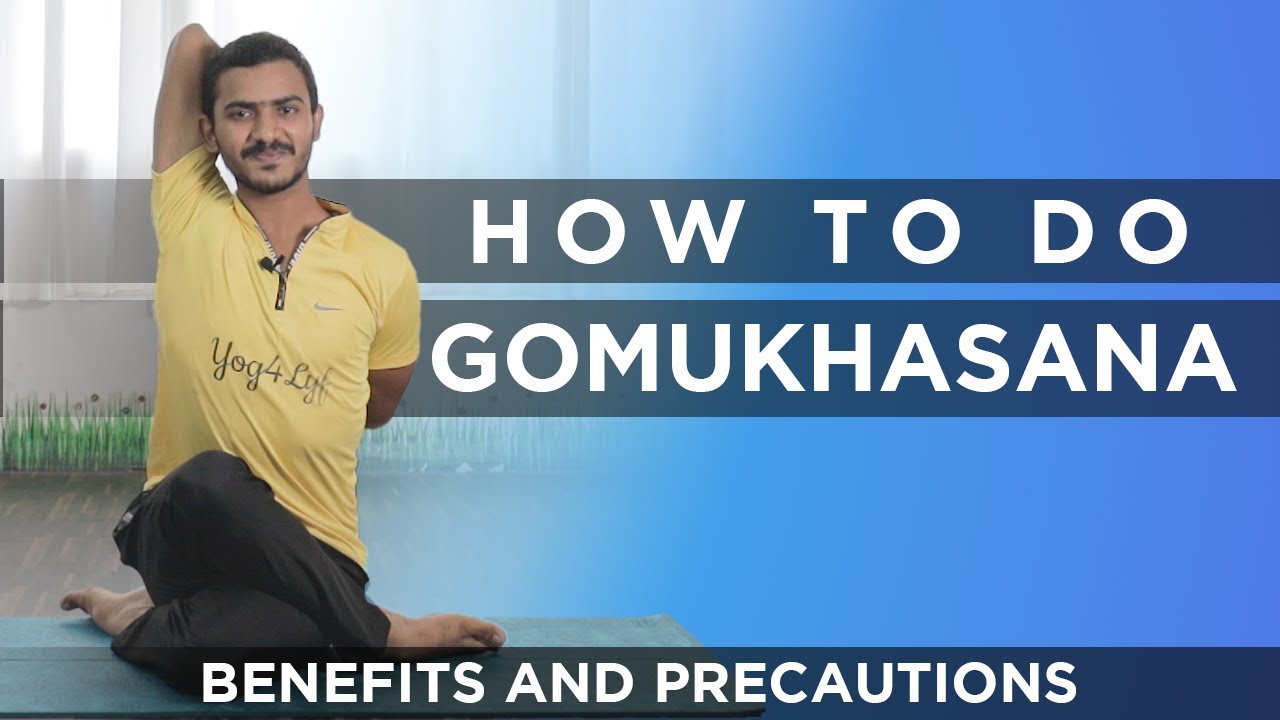
Steps:
- Sit straight on the yoga mat with your legs stretched forwards. Keep your feet together and place your palms next to your hips.
- Now gently bend your right leg and place your right foot under your left buttock.
- Fold your left leg and place it over your right thigh.
- Now raise your left arm above your head and bend the elbow. Bring your right arm behind your back and interlock your hands. Use a piece of cloth if you are unable to get hold of your hands.
- Keep your trunk erect; expand your chest and slightly lean back.
- Take deep breaths and hold onto this pose for as long as you comfortably can.
- To come out of this pose, release your arms and uncross your legs slowly.
- Repeat on the other side.
Precautions:
- Avoid this asana if you are experiencing excessive shoulder pain. And if your pan is bearable, perform this asana under supervision.
- Refrain from doing this asana if you have severe back pain or muscular pain in any key part of your body.
- Also, avoid this asana if you have bleeding piles or Spondylitis.
5. Pigeon Pose | Rajakapotasana (Simplified version)

Steps:
- Begin this asana with Downward Facing Dog pose ( Adho Mukha shvanasan ).
- See that your knees are right under your hips and hands placed a little ahead of your shoulders.
- Now extend your right knee forward such that it is just behind the right wrist. While you are at it, keep your right shin under your torso and bring your right foot in front of your left knee. The outsides of your right shin must be on the floor.
- Slowly slide your left leg to the back. Keep your knees straight and place the front of your thighs on the floor. Lower your right hip on the floor and place your right heels in front of your left hip.
- You can also direct your right knee towards the right making sure it is outside the line of the hip.
- Your left leg must be extended straight from the hip. Make sure it is not angled or turned to the left side.
- Now rotate it inwards such that its midline is pressed against the floor. Slowly inhale and as you exhale, bend your left leg at the knees. Then try to stretch your torso backward so that your head touches your foot.
- Raise your arms, gently folding them at elbows. Use your hands to bring your foot towards the head.
- Keep up this upright position of your pelvis. Push it down. At that point, lift the lower edges of your rib confine against the weight of the push.
- Stay in this position for 30 seconds to one minute.
- Now bring your hands back to the floor and drop your left knee down. Slide your left knee forwards.
- Breathe out and get into Downward Facing Dog pose.
- Repeat on the other side.
Precautions:
- This is an advanced level asana. Its best practiced under expert guidance.
- Avoid this asana if you have severe ankle, knee or back injury.
Yoga for Back pain
1. Downward Facing Dog Pose | Adho Mukha Svanasana

Steps:
- Stand straight on your legs then bend forward.
- Place your palms on the floor, note that your fingers are widely spread and balanced.
- There should be enough space between your knees and palm.
- Now, take note that your wrists are exactly aligned with your shoulder, and knees aligned with hips.
- Stretch your elbows and let your upper back relax.
- Lift both your knees from the floor and raise your pelvis too.
- Straighten your legs gradually, as straight as possible.
- Bring your body into the shape of the alphabet ‘A’.
- Stay stable and do not change the distance between your palms and feet.
- Draw your shoulder blades into your upper back ribs and toward your tailbone.
- Hold this position for 30 seconds and later you can increase your time limit.
- To relax from that position, relax your knees and bend down.
Precautions:
- If the person practicing this pose has stiff or weak back muscles, tight hamstrings, sciatica, or knee problems should practice this pose gently and gradually easing in and out of the pose while keeping the knees bent and back straight.
- Those with Carpal Tunnel Syndrome should press down into the base of their fingers.
2. Cat-Cow Pose
- Refer in ‘Yoga for Heart Disease’
3. Cobra Pose | Bhujangasana
- Refer in ‘ Yoga for Diabetes’
4. Locust Pose | Salabhasana
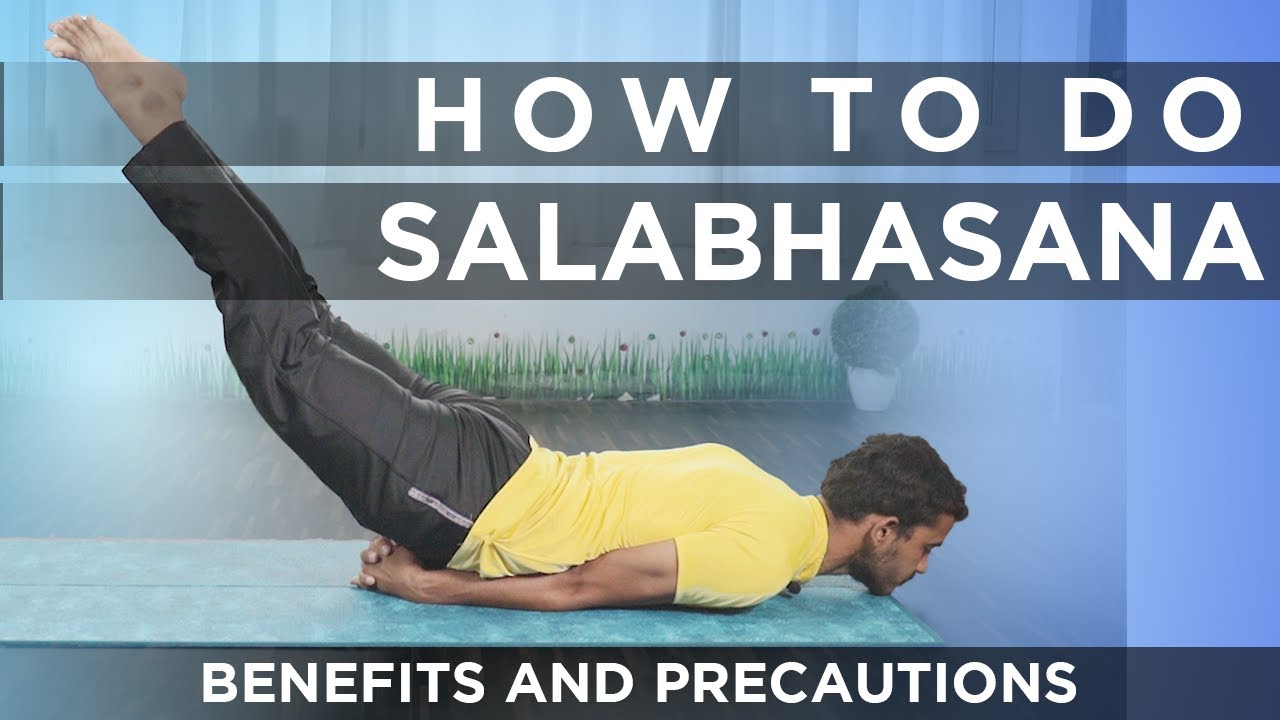
Steps:
- To begin with, lie down on your mat on your belly and place your hands on the inside.
- Breathe in and lift your head away from the floor.
- Keeping your lower belly and pelvis on the floor, raise your leg upwards using your inner thighs. Do not bend your knees.
- Now, raise your arms parallel to the floor and stretch back a little.
- Make sure all your body weight is on your abdomen and lower knees.
- Keep breathing slowly. Stay in this position for 45-60 seconds and then release while exhaling.
- Repeat this asana 2-3 times.
Precautions:
- Refrain from this asana if you have severe back problems or issues with knees or hips.
- Do not practice this asana if you have a headache or Migraine.
- If you are a patient of High or Low blood pressure, please do not practice this asana.
- Do not push your body; only continue if you are completely comfortable.
5. Bridge Pose | SetubandhAsana
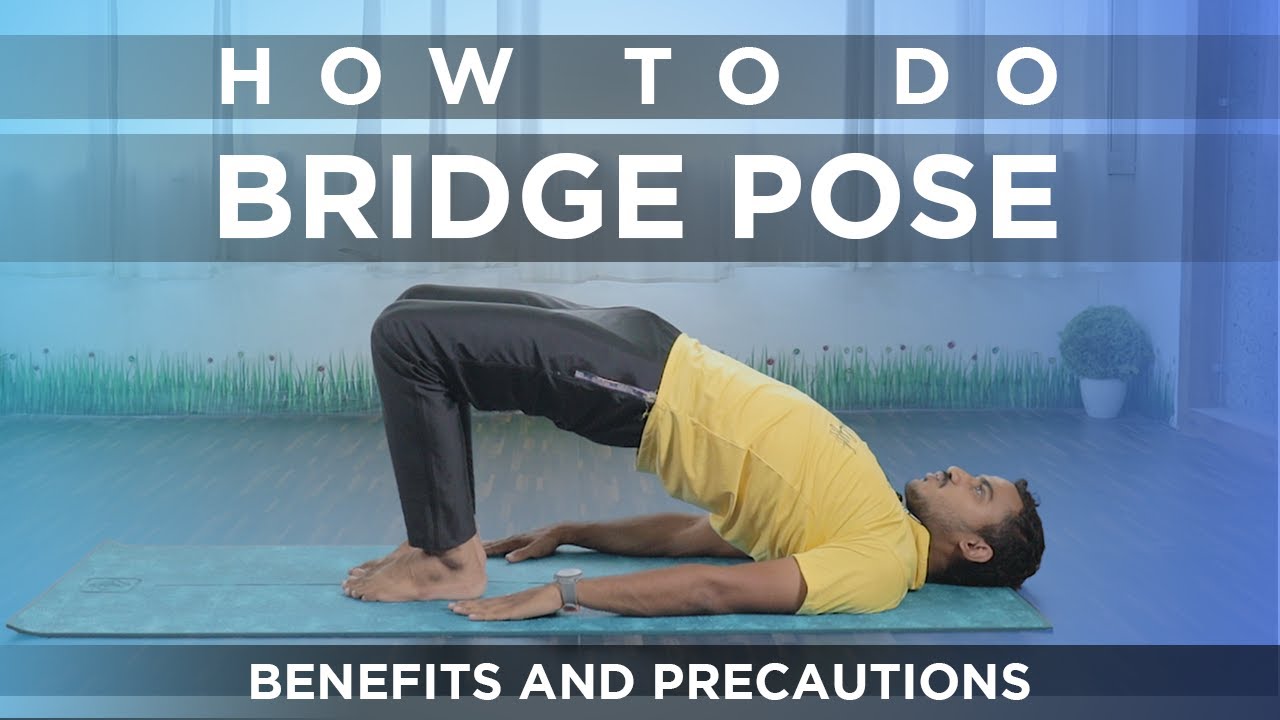
Steps:
- Lying on your back, bend both knees and place the feet flat on the floor hip-width apart.
- Place your arms alongside the body with the palms facing down.
- The fingertips should touch the heels.
- Inhale and lift the hips up, by giving a little pressure on the feet towards the floor.
- Lift your chest up with the support of your arms and shoulders.
- Please note that your shoulders and arms should be resting on the floor.
- Breathe and hold for 4-8 breaths.
- To release: exhale and gently place your spine back to the floor.
Precautions:
- Avoid practicing this pose if you are suffering from neck or back pain.
- Avoid the yoga pose if one is having any knee pain.
- Avoid it during a shoulder injury.
- Avoid moving your head left or right.
6. Child Pose | Balasana
- Refer in ‘Yoga for Insomnia’
Chair Yoga
And now we are at the most interesting segment of this article – “Chair Yoga”.
As the name suggests, it comprises a set of exercises that can be done easily while seating on a chair. Although it is a fact when they say “Yoga is for everyone”, some of our senior friends might find it difficult due to inflexibility, muscular pain, or simply their age.
Chair yoga is a great way for our old friends to get the wonderful benefits of Yoga. These short chair yoga poses can be easily practiced by frail seniors at home or in a group with friends.
Along with the benefits of regular yoga, Chair Yoga can also help with Joint lubrication, anxiety, and also in building strength and balance.

Chair Yoga may be the best for people who are looking to start slow, people with balance issues, or the ones who would feel more confident starting out this way.
There is no specific clothing for Chair yoga, but if possible, go with loose clothing. You must feel completely relaxed while performing these poses. Also, listen to your body, if you feel any kind of pain, just skip that exercise.
Now let’s go ahead and look at some highly efficient Chair Yoga poses.
1. Seated Mountain Pose
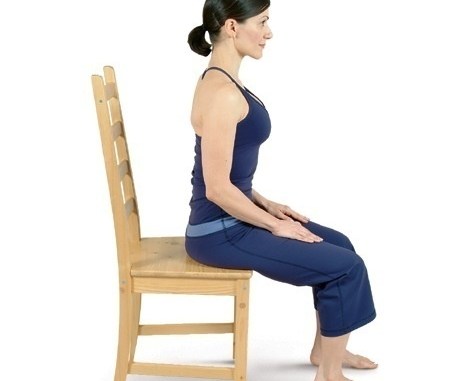
- Grab a chair and sit up straight, hands on your knees, ankles right under your knees and feet flat on the surface. (Side Note: Most of the Chair Yoga exercises will begin with this pose.)
- If you can, sit at the front edge of the chair.
- Take a deep breath and as you exhale, push down your lower body and buttocks into the chair and simultaneously lift your chest and heap upwards giving a fine stretch to your spine.
- Try to focus at some point in your room keeping your head level.
- Hold onto this pose for few minutes, notice your breathing and then slowly get back to normal position.
2. Overhead stretch
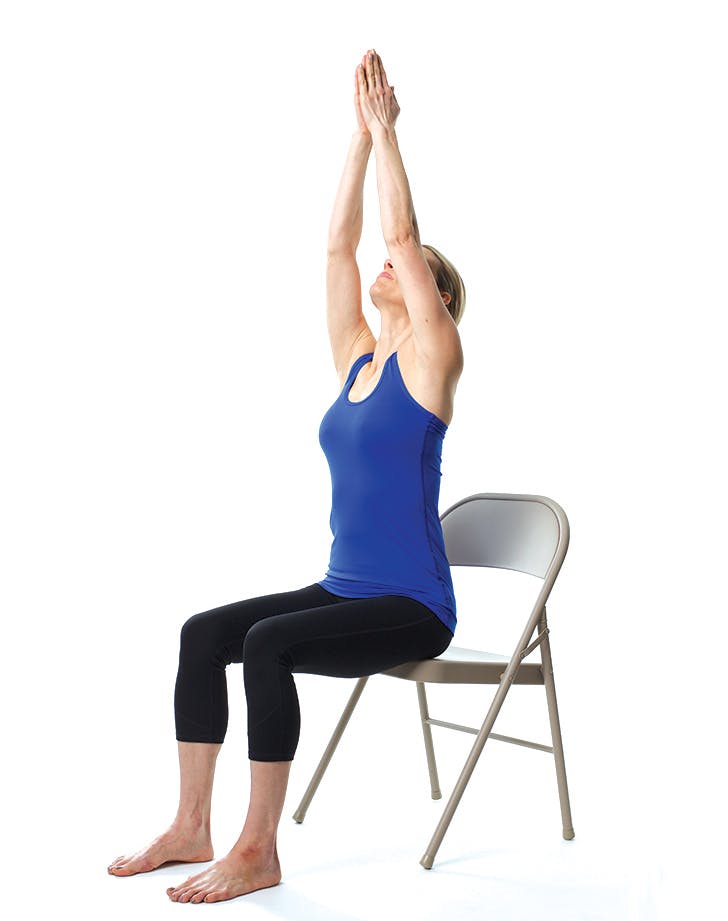
Steps:
- Seated on the chair, take a deep breath, and raise your arms above your head.
- With an exhalation, lower your arms and extend your palms in front of your chest.
- Repeat this for a few times. Inhale while you raise your arms and exhale when you bring them in front of your chest.
- As a variation, you can try spreading your fingers wide apart as you move your arms up and down. Feel the air between your fingers.
- Before you exit this asana, bring your hands together in front of your chest and rest for a moment.
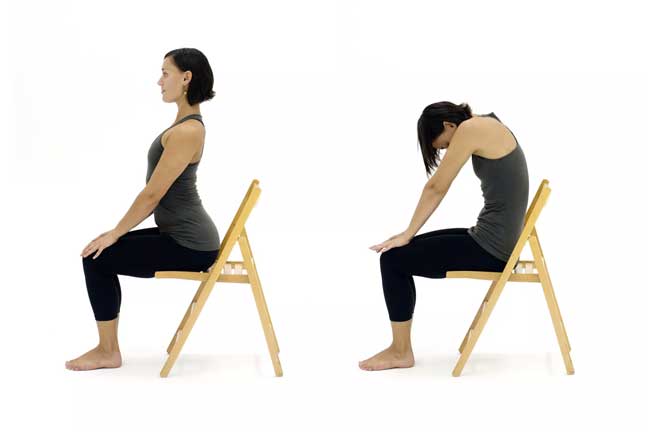
3. Seated Forward Bend
Steps:
- Begin with sitting straight on the chair. Spine erect and hands resting on your thighs.
- Lean forward keeping the spine straight. Try to touch your thigh with your chest.
- Hold onto this pose for a few breaths. You will feel a slight pressure on your intestines.
- It helps with digestion as well as stretches your spine and back muscles.
- Now inhale and slowly lift your torso back to the normal position.
- Repeat few times.
4. Seated Cat-Cow Stretches
Steps:
- Sit straight with your hands placed on your thighs (refer seated mountain pose).
- Now with an inhalation, gently arch your spine pushing your chest and belly forward, looking slightly up.
- Exhale and gently round your spine, looking slightly down towards your belly button.
- Repeat this few times.
5. Gentle Seated Twist
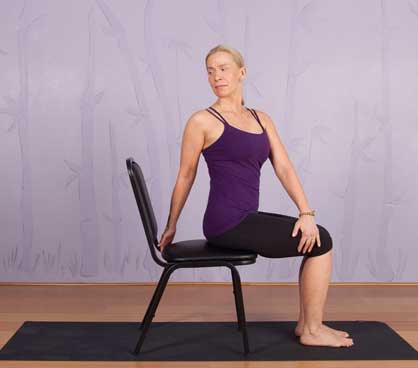
- Firstly, we will get into a seated mountain pose.
- Now place your left hand on your right knee and right hand on your right hip.
- Take a deep breath and as you exhale, gently turn your body toward the right and look over your right shoulder.
- Hold this twist for fee seconds and feel your breathing while you are at it. You might notice sensations around your spine.
- While exhaling, slowly come back to the seated mountain pose.
- Repeat this for the left side.
Laughter Therapy
Anyone who looks at a group of people deliberately laughing together might be puzzled of the activity, but only the ones who practice this know about the benefits of group laughter therapy.
Yes, it is especially for those senior citizens who introspect themselves and realize that a community of the same mindset can help and motivate each other.
Retirement, lack of bonding, frequent sickness, and physical immobility are some of the major reasons affecting Senior Citizens in more than one way, which may lead to depression, anxiousness, and mental agony.
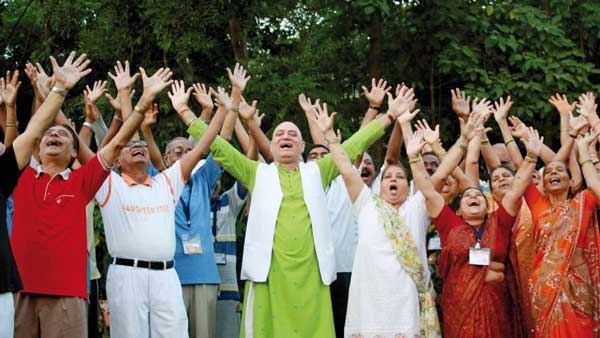
- Research has found that ‘Laughter Therapy’ can significantly improve quality of life, especially for old folks. It is a scientifically proven and indeed the best medicine one can prescribe to older adults.
- A good laughing session helps in relieving stress and anxiety by increasing blood vessel function and boosts overall happiness.
- Laughter is an instant stress buster as it touches emotional core and alleviates feelings of loneliness and isolation.
There are many ways to perform ‘Laughter Therapy’ and interestingly, there is no wrong way to do it per say. Laughter therapy is closely linked with breathing exercises which results in increasing oxygen levels in the brain. These exercises are designed to be simple and entertaining.
- A typical laughing session comprises of people seated or standing in a circle, laughing their heart out for a particular set of minutes.
- The most beautiful thing about ‘laughter’ is that it can also be shared with a person who does not speak the same language as you.
- The only goal is to laugh out loud. Look around at your friends, mates, and watch everybody laughing along with you.
- Good laughter not only helps with the synchronized contraction of facial muscles but also increases the levels of endorphins, dopamine, and other stress-reducing chemicals in the body.
- Laughter therapy works best when performed every day and besides, seniors enjoy daily meetings as it generates a sense of belonging.
- Laughter therapy can give seniors that much needed feeling of closeness and fraternity.
- Laughter therapy has been a life-changing experience for hundreds and thousands of people around the globe. If you are yet to try it, give it a go and encourage the people around you to join you in this joyful exercise.
There are plenty of health benefits of yoga; all you need is a little dedication and consistency with your yoga practices and you will see for yourself how your body, mind, and soul is balanced allowing you to lead a peaceful and happy life.