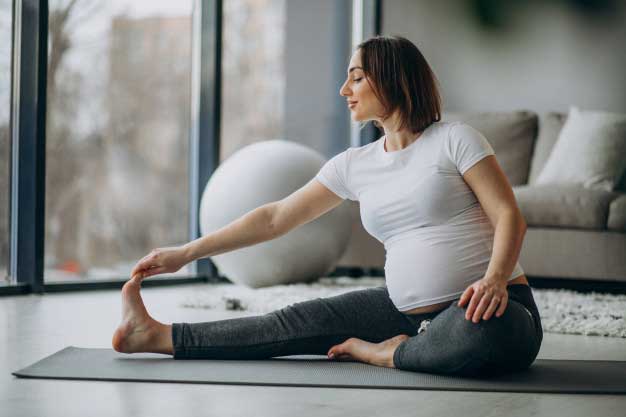
Hello Beautiful Moms, this Prenatal Yoga for Pregnancy blog is specially made for you, to accompany you on your journey, taking care of your mental and physical health!
There is no any other phase as magnificent as the phase of childbearing for a woman. It is so new, novel bodily changes and the realization of a tiny human growing inside your womb. Every Mother wants to do the best for her child in every way during these. It doesn’t matter what the task might be, a Mother will do anything and everything for her child to have the best life.
Research suggests that prenatal yoga is safe and can have many benefits for pregnant women and their babies.
– Mayo Clinic

If yoga is practised regularly during pregnancy, the pain while delivery is less compared to others, positive energy, stronger muscles!
Important reasons to practice yoga when pregnant are as following:
- To loose up your hip and knee joints.
- To help in natural and less painful delivery.
- To remove fatigue in legs and relax inner thighs.
- To improve digestion and remove constipation.
- To tone and loosen up the pelvic muscles.
- To strengthen the middle back, uterus, thighs, and ankles.
As we all know that Pregnancy is of 9 months and divided into 3 trimesters. We are going to divide these yoga poses into 3 trimesters, follow those yoga poses mentioned in each trimester respectively. DO NOT MIX UP ANY YOGA POSE FOR ANY OF THE TRIMESTER!
Because we care for you and your baby and growing with each trimester there are some yoga poses that are not supposed to be practiced.
To, all my readers, please note that the yoga poses mentioned here are safe to practise and won’t harm your health in any way, however, consulting your doctor before straining any part of your body, especially the belly would be advised.
We are going to see different yoga poses for each trimester. Check out the following list:
First Trimester:
- Half Butterfly Asana | Ardha Titli Asana
- Full butterfly Asana | Poorna Titli Asana
- Lying Abdominal Stretch pose | Supta Udarakarshanasana
- Chopping Wood Pose | Kashtha Takshasana
- Standing Spinal Twist | Kati Chakrasana
- Mill Churning pose | Chakki Chalanasana
- Bridge Pose | Setu Bandhasana
- Forward bend | Uttanasana
- Frog Pose | Mandukasana
Second Trimester:
- Half Butterfly | Ardha Titali Asana
- Full Butterfly | Poorna Titali Asana
- Forward Bend | Utthanasan
- Neck Rotations and Stretching
- Diamond pose | Vajrasan
- Seated Forward Bend | Paschimottasana
- Downward Facing Dog | Adho Mukha Svanasana
- Child Pose | Balasana
- Side Leg Lift | Vishnu Pose
- Raised Hands Pose | Urdhva Hastasana
- Eagle Pose | Garudasana
Third Trimester:
- Neck Rotations and Stretching
- Tree Pose | Vriksasana
- Warrior pose 1 | Virabhadrasana 1
- Warrior pose 2 | Virabhadrasana 2
- Triangle pose | Trikonasana
- Low Lunge Pose | Anjaneyasana
- Pranayama
- Meditation – Talk to your baby.
First Trimester:
In this period, a Mother comes to know about her child in her womb, it’s new and can observe dramatic changes in her body. Any movement which strains the belly area should be avoided, thus Yoga is the best form of exercise during pregnancy.
Please note that all the mothers who are going to practice yoga with us, kindly listen to your body, understand the limits of your body.
1. Half Butterfly Asana | Ardha Titli Asana
Steps:
- Sit down in a relaxed position with your back straight & legs stretched forwards.
- Gently place your right foot on top of your left thigh as close as possible to the hip.
- The sole of the foot usually faces up; if not convenient, let your footrest on the floor inside of the thigh.
- Gently hold the toes of the right foot with your left hand.
- Now using your right hand, move your knee up and down 10-15 times with slight pressure.
- Repeat this exercise for the left leg.
Precautions:
- Avoid this exercise if you have pain in knees, ankle joints, and hips.
2. Full butterfly Asana | Poorna Titli Asana

Steps:
- Sit down with your spine erect and legs pulled out straight
- Bring both feet towards your pelvis while both your soles of feet face each other.
- Firmly, hold your feet with your hands. If needed, you may place your hands underneath feet for support.
- Make sure your feet are close to your genitals as possible.
- Start deep breathing and gently press knees and thighs towards the floor.
- Slowly start swinging your knees and thighs up and down and increase the speed at your convenience.
- Take in a deep breath and while you exhale, slowly lean forward. Try keeping your chin up and spine straight.
- Enjoy this posture, take deep breaths & make sure your knees & thighs are closer to the floor.
- Gently try to go back to normal position with legs straight and relax.
Precautions:
- People suffering from Sciatica should use a pillow to raise the hips or completely avoid this asana if too painful.
- Those suffering from groin or knee injury, make sure to put a cushion/blanket on outer thighs.
- If you have lower back disorders, avoid rounding up the spine by leaning forwards.
3. Lying Abdominal Stretch pose | Supta Udarakarshanasana
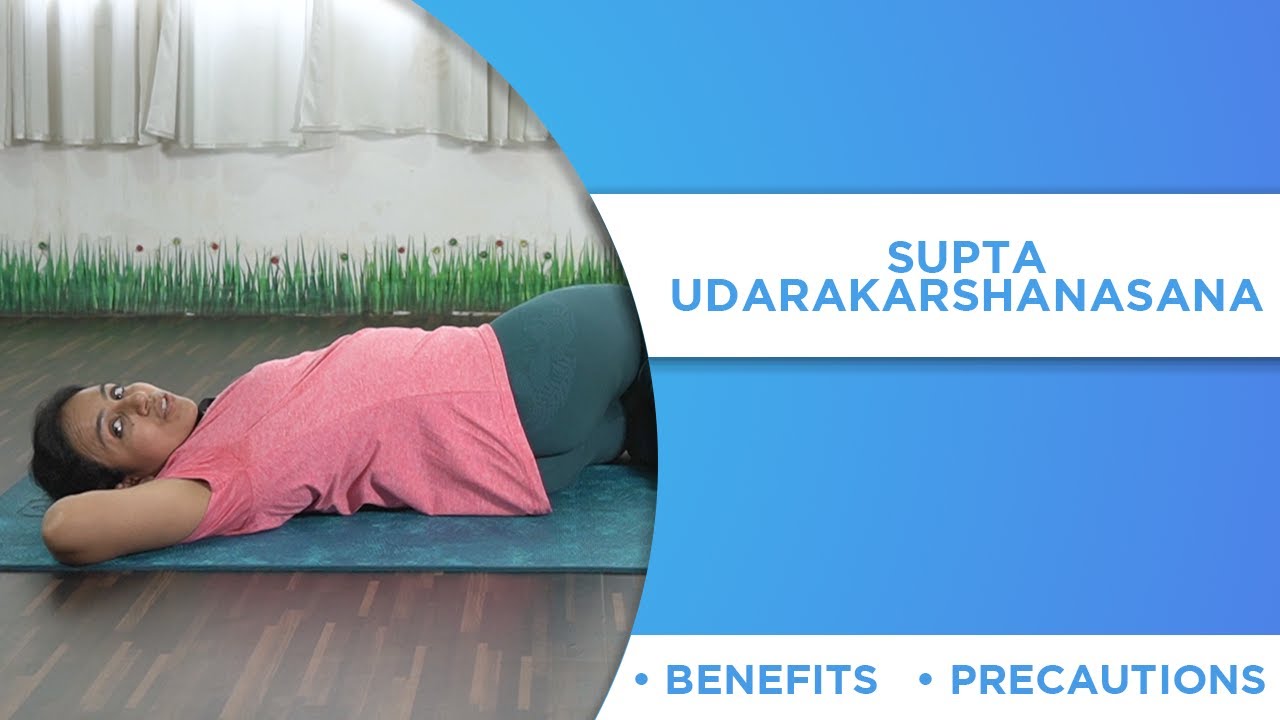
Steps:
- Lie down gently on your back.
- Bend your knees and bring your feet towards your hip. Make sure the sole of your feet is resting flat on the floor.
- Interlock your fingers and place your palm under the back of your head. Push your elbows towards the floor as much as you can.
- Take a deep breath and turn both your legs on the right side. Try to touch your right thigh to the floor.
- Hold your breath for 3-5 seconds and inhale while you bring your knees right back to the centre.
- Lower your knees & gently bring back your hands to the side of your body to release this position.
Precautions:
- Those having any kind of hip, knee or spine injury should avoid this asana.
4. Chopping Wood Pose | Kashtha Takshasana

Steps:
- Sit in squatting position with the feet flat on the floor.
- Think of this asana as the action of “Wood Chopping”
- Make sure your feet and one and a half feet apart while getting into this pose.
- Clasp your fingers together and place them on the floor between the feet.
- Straighten your arms and make sure to keep them straight throughout this practice.
- Both your elbows should be inside the knees.
- Now from behind the head, slowly raise your arms as high as you can, stretching the spine.
- Make sure your eyes are open during this asana. Look upwards towards your hands.
- Make a downward stroke with your arms as if you are chopping wood.
- Expel the breath by making a deep sound from your throat to remove air from your lungs.
Precautions:
- This asana should not be practised by pregnant females in the second and third trimester of pregnancy.
- People gone through recent hip surgery, having chronic spinal issues or slip disk issues should avoid this asana. Release yourself from the pose if you feel sharp shooting pain in your legs.
5. Standing Spinal Twist | Kati Chakrasana
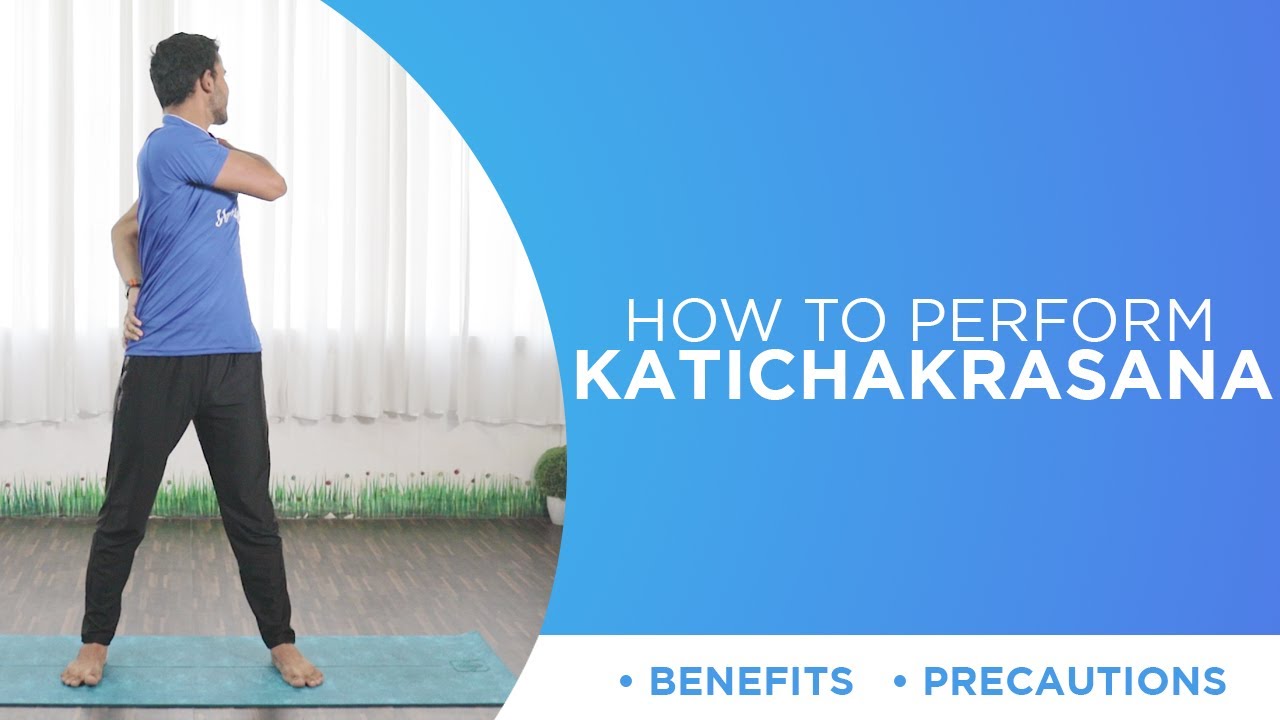
Steps:
- To begin with, this asana, stand straight keeping your spine erect.
- Move your feet apart with one shoulder-width apart.
- Now slowly breathe in and raise your arms and rotate your waist to the right.
- Keep your breath out and maintain this pose as long as you comfortably can.
- Now breathe in and come back to the centre position.
- As you breathe out, raise your arms and twist your upper body to your left side.
- Stay in this position for as long as you can and come back to normal position smoothly.
Precautions:
- If you have high blood pressure, be cautious while performing this Asana.
- People who have gone through an abdominal surgery, spinal injuries, hernia, slip disk should avoid this Kati Chakrasana.
6. Mill Churning pose | Chakki Chalanasana
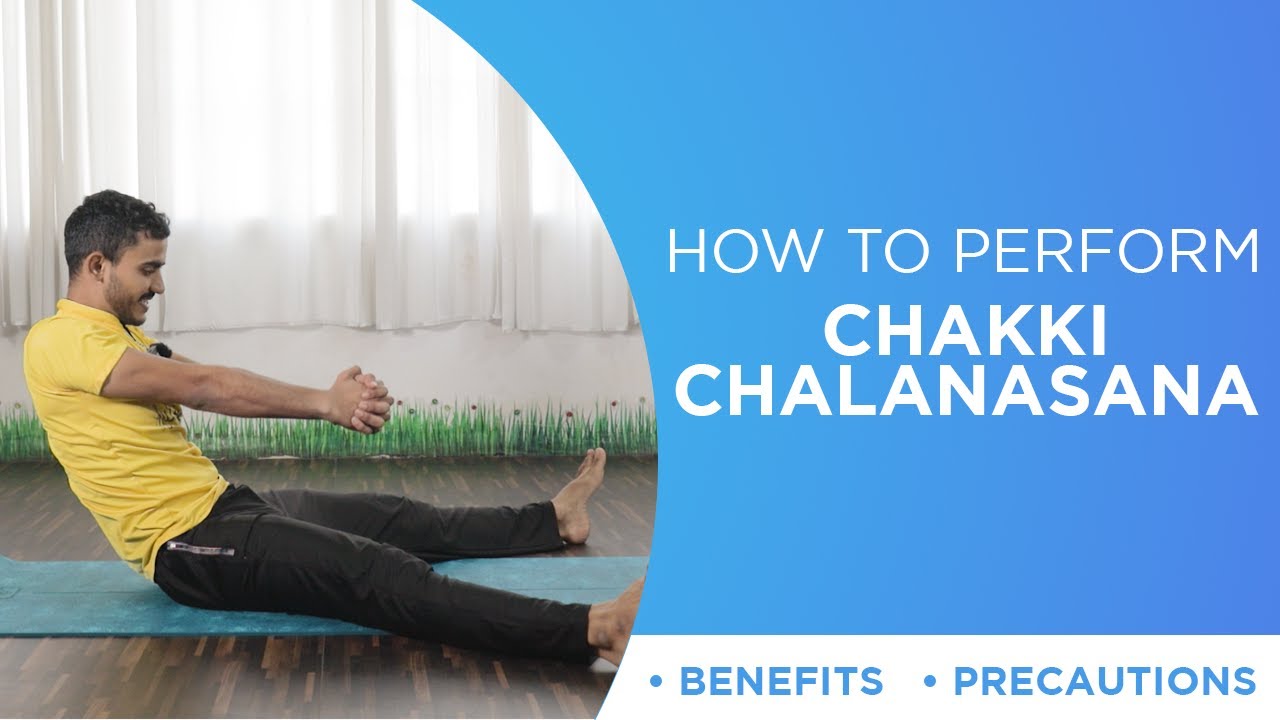
Steps:
- Sit down comfortably with your legs spread apart.
- Outstretch your arms & clasp your hands at shoulder height in front of you.
- Take a deep breath and start moving the upper part of your body by leaning it to front and right making an imaginary circle.
- Inhale while you lean forward to the right and exhale while you move back to your left.
- Make sure to outstretch your arms while performing this asana.
- Take deep breaths while you perform this Mill Churning pose several times as per your convenience.
Precautions:
- Pregnant women having low blood pressure should not perform this asana.
- People suffering from Migraine or headache, lower back pain due to slip disk or had recent abdominal surgery should avoid this asana.
7. Bridge Pose | Setu Bandhasana
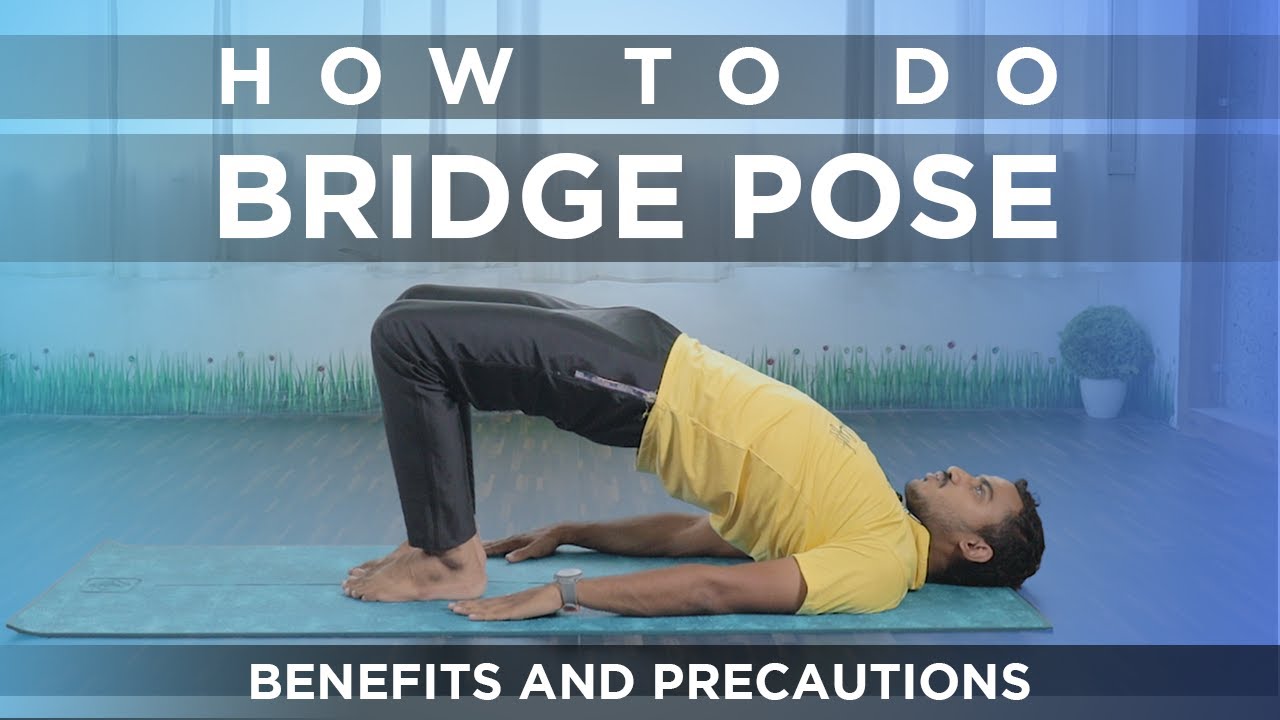
Steps:
- Lie down comfortably on your back. Place your hands next to your buttocks, legs joined together and eyes facing the sky.
- While resting, bring your feet near your buttocks and keep them on the floor with a little distance between them.
- Now firmly grab your ankles of respective feet.
- Take a deep breath and slowly raise your back while you inhale. Your chest should go near your chin.
- Recite ‘om’ or count 1,2,3,4,5 while holding this position.
- Now exhale while lowering your back and buttocks.
- This is one round. Practice 5 such rounds.
Precautions:
- In the later stage of pregnancy, she would be recommended not to raise their buttocks above 15 cm.
- People with serious knee or shoulder injuries should avoid this asana.
- It should also be avoided by people having an abdominal hernia situation.
8. Forward bend | Uttanasana
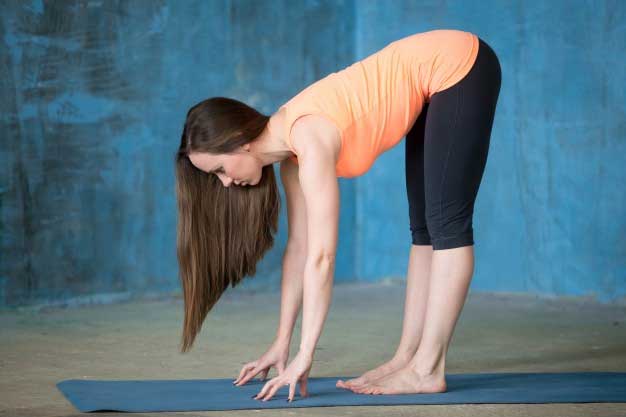
Steps:
- Stand straight on the ground and maintain distance between your feet.
- Raise both your arms together towards the sky with a deeply focused inhalation.
- Exhale and bend forward, letting your palm touch the floor.
- Your hips would act as a common point between the upper body and lower body, maintain balance.
- Feel your back stretching in opposite directions as you pull the head down and in and press the hips up.
- Breathe and hold for 4-8 breaths, pressing the belly into the thighs on the inhalation.
Precautions:
- You need to refrain from practising this pose if you face chronic problems or have a history of any injury in your knee joints, ankle joints, or back.
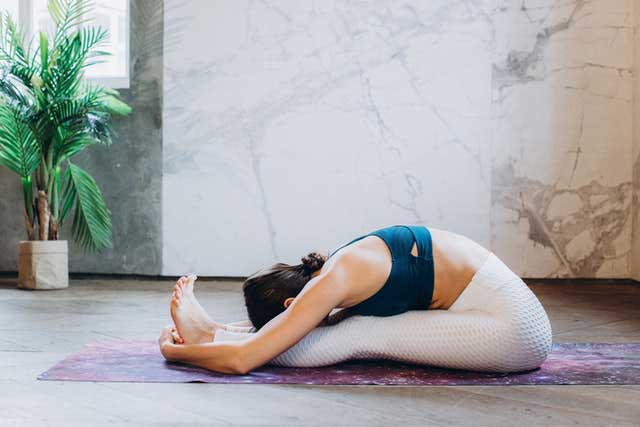
9. Frog Pose | Mandukasana

Steps:
- For Mandukasana, sit in Vajrasana. Make fists with both hands with thumbs inside.
- Place your fists on your belly at the navel region.
- Take a deep breath and while you exhale, bend forward keeping maximum pressure on your naval region.
- Keep your eyes open while bending forward. Your chest should touch your thigh.
- Hold your breath for as long as you comfortably can.
- Now inhale-exhale and slowly come back up.
- This is one round. Repeat this for 3-5 times.
Precautions:
- Do not put too much pressure on your stomach while performing this asana.
- After the first trimester, a pregnant woman should avoid this asana.
- People suffering from peptic or duodenal ulcer, severe back pain & cardiac problems should avoid this asana.
- Also avoid this asana if you have Migraine, high blood pressure, ankle injuries or insomnia.
Second Trimester:
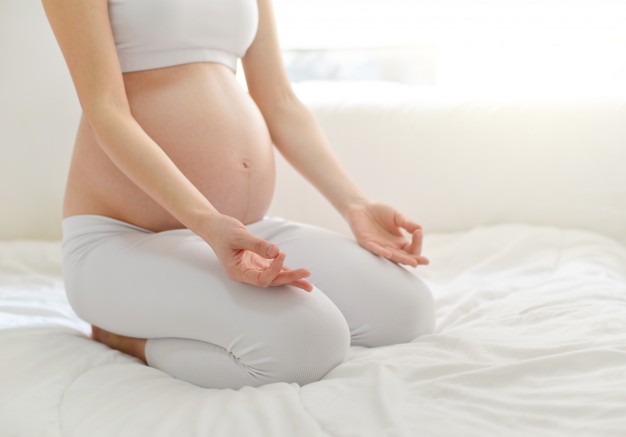
The belly starts growing and you can feel the movements of your baby inside your belly. This phase makes you feel more connected to the baby. As the belly starts growing some areas of your body get stiff like the neck and shoulders. we shall cover all those yoga poses in the second trimester which would relax the stiff muscles.
The Yoga routine in the first trimester loosen up hip and knee joints, strengthens inner thighs and pelvic muscles. These poses are recommended to be practised throughout the second trimester too. So we will continue to practise Half Butterfly , Full Butterfly , Forward Bend in the second trimester as well. If you are missing on the steps please refer to the details in First Trimester above in this post. Again, a gentle reminder practise these poses gently and never push or force yourself to attain a pose as shown in these images.
4. Neck Rotations and Stretching
Steps:
- Sit comfortably and keep you back straight aligned to your neck.
- Then slowly tilt your head on heft and stretch your neck from the centre to left and hold for 2 seconds.
- Come back to a normal position aligned with your back at centre and then slowly tilt your head towards your right side and stretch your neck to the right and hold for 2 seconds.
- Come back to normal position and repeat the process for a minute.
- Sit comfortably and keep you back straight aligned to your neck.
- Slowly move your head from right to left in a circular motion, complete the circular motion by coming back to the right side.
- Keep your neck relaxed and let it stretch within your capacity with the circular movements.
- After clockwise rotation of your neck for 30 seconds, take a pause and start anti-clockwise rotations for another 30 seconds.
Precautions:
- Those with recent surgery or damage in the neck area should avoid this stretch.
5. Diamond pose | Vajrasan
Steps:
- Sit in a position where the soles of your feet are on your buttocks.
- Place the thighs on the legs one over the other and soles on your buttocks.
- Your whole body weight should fall on your knees and ankles. Make sure your calves are touching the thighs.
- Sit straight with an erect spine and close your eyes.
- Take a deep breath and place your palms on the respective knees while you inhale and exhale.
- Hold on to this position for 3-5 minutes initially. Gradually increase the time up to 15 minutes.
Precautions:
- People suffering from joint pain should avoid this asana.
- People having lower back problems and spinal problems should avoid this asana.
- Those having a hernia, intestinal ulcers and other diseases related to small and large intestines should practice this yoga under expert guidance.
6. Seated Forward Bend | Paschimottasana
Steps:
- Sit straight on the ground, stretching your legs out front.
- Make sure your toes are together pointing forwards.
- Now, breathe in, raise your arms above and stretch up.
- Breathe out, bend forward from hip joints. Make sure your spine is erect and move forwards towards the toes, not downwards towards your knees.
- Try grabbing your toes with your fingers and if you’re unable to do that, place your hands on legs as far as you can. The nose should touch the knees.
- Inhale and slightly lift your head and lengthen your spine.
- Move the navel towards the knees while breathing out.
- Breathing in, stretch your arms out in front of you and slowly come back to normal position.
- Breathe out and lower the arms.
Precautions:
- Avoid this asana if you have lower back pain, diarrhoea, Asthma or slip disk.
- Do not bend beyond your comfort level.
7. Downward Facing Dog | Adho Mukha Svanasana

Steps:
- Stand straight on your legs then bend forward.
- Place your palms on the floor, note that your fingers are widely spread and balanced.
- There should be enough space between your knees and palm.
- Now, take note that your wrists are exactly aligned with your shoulder, and knees aligned with hips.
- Stretch your elbows and let your upper back relax.
- Lift both your knees from the floor and raise your pelvis too.
- Straighten your legs gradually, as straight as possible.
- Bring your body into the shape of alphabet ‘A’.
- Stay stable and do not change the distance between your palms and feet.
- Draw your shoulder blades into your upper back ribs and toward your tailbone.
- Hold this position for 30 seconds and later you can increase your time limit.
- To relax from that position, relax your knees and bend down.
Precautions:
- If the person practising this pose has stiff or weak back muscles, tight hamstrings, sciatica, or knee problems should practice this pose gently and gradually easing in and out of the pose while keeping the knees bent and back straight.
- Those with Carpal Tunnel Syndrome should press down into the base of their fingers.
8. Child Pose | Balasana
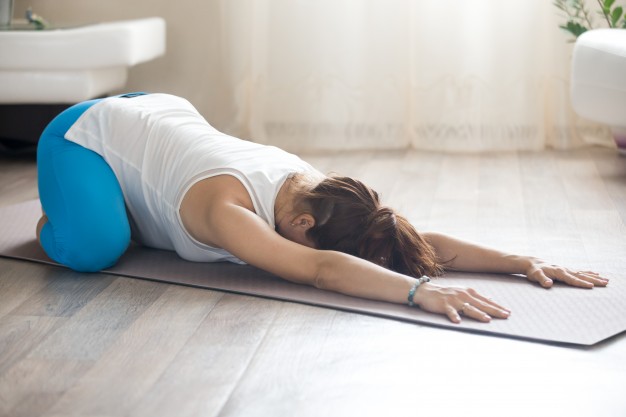
Steps:
- Kneel on your knees and keep your knees at a distance parallel to your hips.
- Bend down and let your palm touch the floor.
- Stretch your hands as much as possible.
- Let your face position itself between your hands and touch the floor.
- Now let your buttocks touch your heels slowly.
- Keep breathing slowly, focusing on your breathing.
- Stay in the same position for 30 seconds for beginners, later you can increase the time up to 2-3 minutes.
Precautions:
- Avoid this pose if you are suffering from diarrhoea.
- If you are pregnant, then spread your knees wider and do not apply more pressure on the abdominal area.
- Avoid child pose if you have any knee injuries.
9. Side Leg Lift | Vishnu Pose
Steps:
- To begin with, lie down comfortably on a mat.
- Rollover to your left side pressing the heels and the outer part of the left foot firmly to the floor.
- Raise your right arm above your head keeping it at 90 degrees to your body.
- Now lift your head off the floor and rest it on your left palm.
- Rest your right arm on the side of your body and maintain balance.
- Now bend your right leg at the knee, try to grab your toe using your thumb and first two fingers.
- Strengthen your leg towards the ceiling for as long as you can.
- Maintain your balance without rolling.
- Slowly release your toe and roll to your back.
- Repeat this pose by lying on the other side.
Precautions:
- People suffering from slip disk, sciatica and cervical spondylitis should either refrain from practising this asana or perform it under expert guidance.
10. Raised Hands Pose | Urdhva Hastasana
Steps:
- Stand in Mountain pose (Tadasana). Breathe in and bring your palms out to the sides and up towards the ceiling.
- Your arms should be parallel, try to bring your arms overhead only if you are able to do it without hunching up your shoulders.
- Now, firmly press your arms together all the way to your fingers.
- Slide your shoulders away from your ears and your shoulder blades down your back.
- If you feel like your ribs are jutting forward or pulling apart, knit them back together. Keep your thigh muscles strongly engaged so that they draw kneecaps up.
- Slowly lower your arms to release the pose.
Precautions:
- Avoid this pose if you have shoulder or neck injury.
11. Eagle Pose | Garudasana
Steps:
- Begin this asana by standing in Tadasana.
- Slightly bend your knees, lift your left leg and cross it over the right thigh balancing your body.
- Now bring your arms forwards keeping them parallel to the floor. Palms should face the ceiling.
- Bend the elbows, wrap your left arm around the right arm. You can rest your left hand’s fingers firmly on the right hand.
- Make sure your spine is erect.
- Lift the elbows to the height of your shoulders.
- Gaze at a fixed point, deep breathe and hold on to this position for a couple of breaths.
- Slowly release your arms followed by your legs and come back in starting position.
- Take deep breaths and repeat on the other side.
Precautions:
- Third-trimester pregnancy shouldn’t practice this asana.
- Avoid this asana if you have recent knee, ankle or shoulder injury.
- If you have frequent headaches, high or low blood pressure, asthma or obesity, choose to avoid Eagle pose.
Third Trimester:
Oh! Your belly is getting much bigger, you can feel more movements and those cute kicks feels like the baby is responding and trying to communicate, you wait for those kicks to be felt, now everyone around you asks you to be more cautious, but you know what? You know what’s best for you and the baby, just stay connected to your body all the time. Yes, one has to be careful, just take note that practise yoga within your limits.
We can start with the gentle Neck rotations and stretching and then continue with the yoga poses. It helps to relax the tense and rigid neck muscles.
1. Tree Pose | Vriksasana
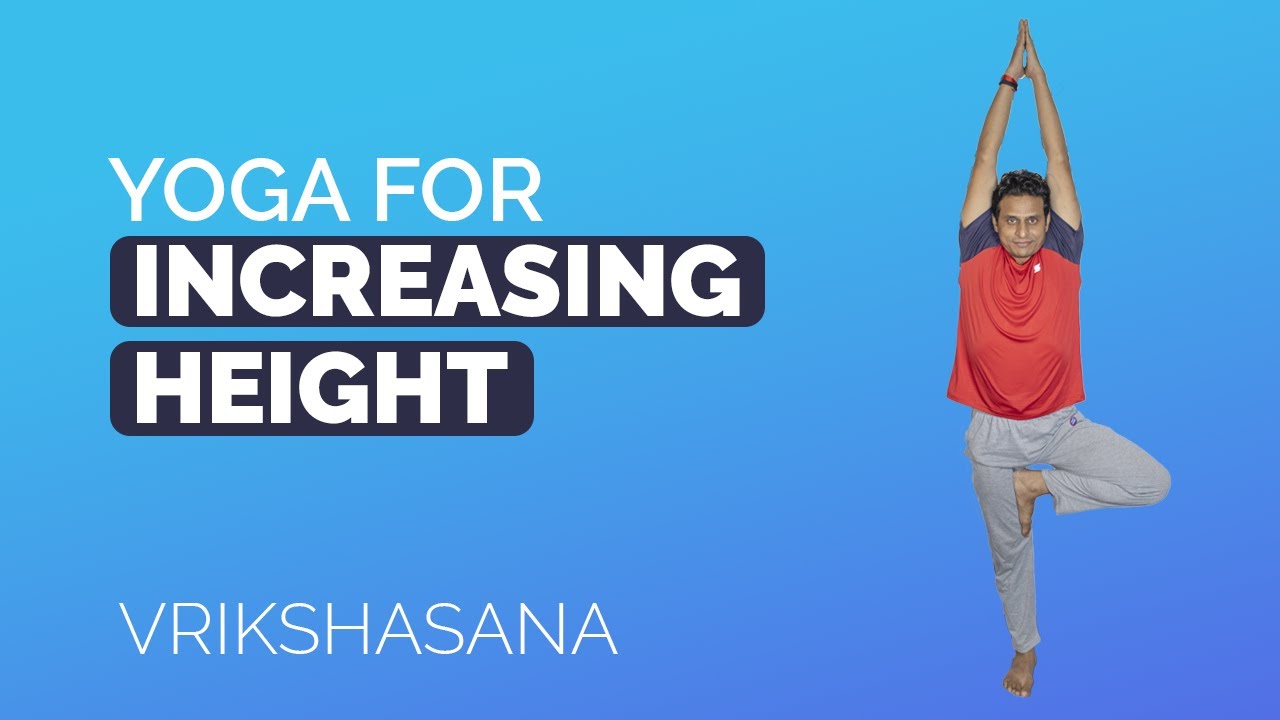
Steps:
- Stand straight with both your legs well balanced.
- Raise your feet and place it on your inner thigh of another leg, above knees.
- Your whole sole area of the raised leg should be touching the inner thigh
- Maintain a balance on one leg might be difficult, try putting a right and balanced amount of weight on the body parts.
- Raise your hands above your head and let your palm face each other, and then brought close to each other, joining.
- Maintain the balance and hold the pose as long as possible, practice it every day and try keeping a goal of maintaining the pose for 1 minute.
Precautions:
- Never place your feet exactly on the side of the knees, as the pressure would damage your knee, thus it should be always placed above knees in the inner thigh area.
- If you are suffering from high blood pressure, do not keep your hand above your head, place them near your chest.
- Avoid this pose if you are suffering from insomnia or migraine.
2. Warrior pose 1 | Virabhadrasana 1
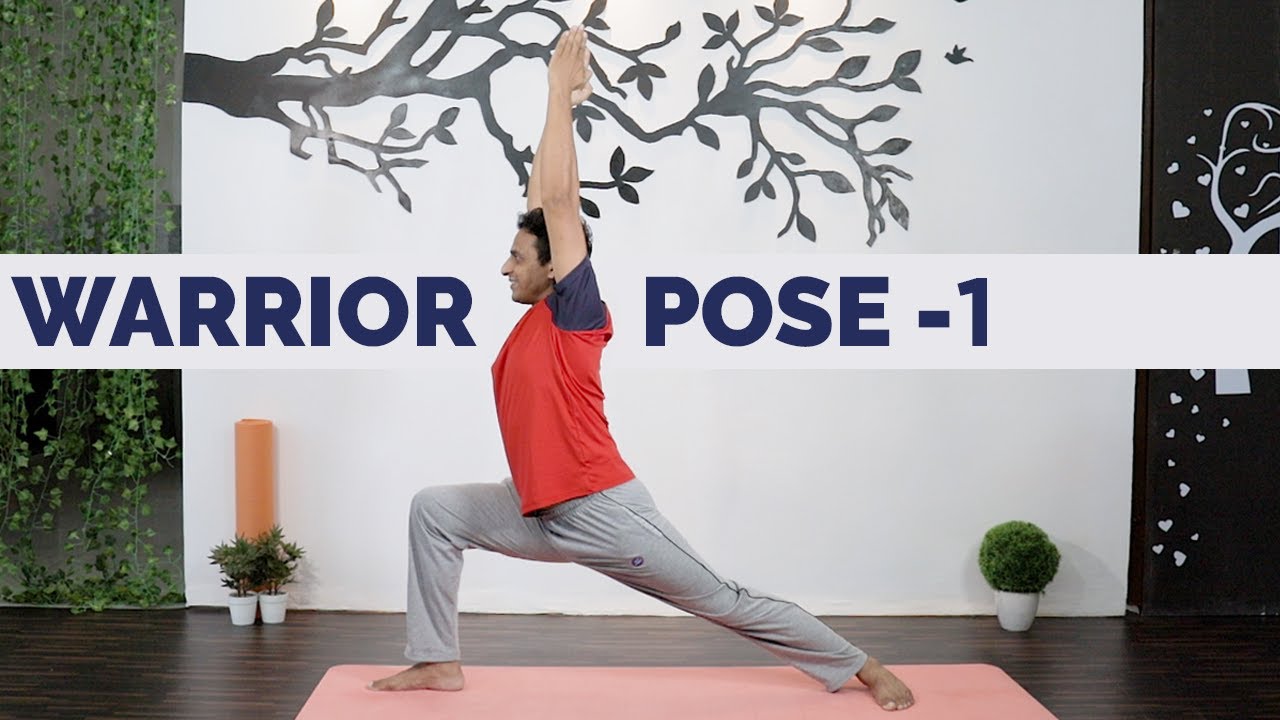
Steps:
- Stand straight and keep 3ft distance between your legs.
- Turn your right leg to 90-degree angle and the left leg be kept in a comfortable angle
- Then turn your upper body to your right side and bend a little, folding your right leg and left leg straight.
- Raise your hands above your head and hold the pose for 30 seconds
- Repeat the same on the other side too.
- You can gradually increase the time of holding the pose can repeat the same after taking some rest.
Precautions:
- Avoid this pose if you are suffering from high blood pressure and any heart problems.
- Avoid this pose if you recently suffered from Diarrhoea.
- Use some support if you have any knee-related issues, like any kind of injury or arthritis.
3. Warrior pose 2 | Virabhadrasana 2
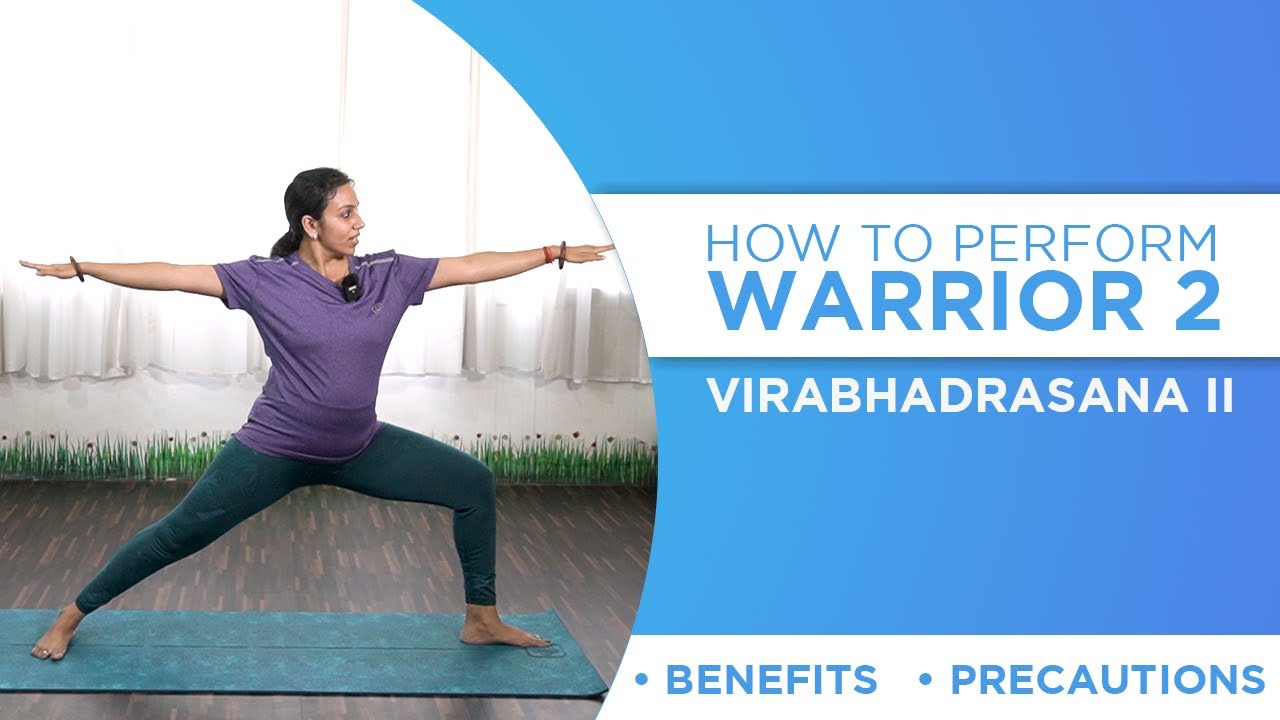
Steps:
- Stand straight and keep 3ft distance between your legs.
- Turn your right leg to 90-degree angle and the left leg be kept in a comfortable angle
- Then turn your upper body to your right side and bend a little, folding your right leg and left leg straight.
- Raise your hands by your side and hold the pose for 30 seconds
- Repeat the same on the other side too
- You can gradually increase the time of holding the pose can repeat the same after taking some rest.
Precautions:
- Avoid this pose if you are suffering from high blood pressure and any heart problems.
- Avoid this pose if you recently suffered from Diarrhoea.
- Use some support if you have any knee-related issues, like any kind of injury or arthritis.
4. Triangle pose | Trikonasana

Steps:
- Stand on your mat with your feet apart. (4-5 feet)
- Keep your heels are aligned with each other.
- Turn your right foot out 90 degrees.
- Raise your arms to the side of your shoulder, and parallel to the ground with your palm facing down.
- Exhale and position your right hand in the same direction as your right foot. Shift your left hip back so your tailbone and pelvis tilt toward the wall or space behind your left foot.
- Turn your left palm forward, with your fingertips towards the sky.
- Rest your right hand near your ankle. Align your shoulders so your left shoulder is directly above your right shoulder.
- Hold this position for 1 minute, take rest and so the same with your left leg turning to 90 degrees this time and repeat the above-mentioned steps with your left hand.
Precautions:
- Avoid practising this pose if you are suffering from high blood pressure or headache.
5. Low Lunge Pose | Anjaneyasana

Steps:
- Start this asana by Downward-facing dog pose (Adho Mukha Svanasana).
- Breathe out and bring your right foot forward beside your right hand.
- Make sure your right knee and ankle are parallel to each other.
- Gently lower down your left knee and place it on the floor right behind the hips. Your left foot should be resting on the floor completely.
- Breathe in and lift your torso up. Simultaneously raise your arms above your head in a way that your shoulders are touching your ears.
- Make a ‘Namaskar’ gesture by combining your arms.
- Look up and bend your head slightly backwards.
- Exhale, relax your hips and hold on to this pose for 15-20 seconds depending the feeling of stretch within the frontal region of your legs.
- To release this pose, place your hands back to the floor and get back into the Downward-facing dog pose.
- Repeat this with your left foot.
Precautions:
- Do not perform this asana if you have high blood pressure.
- If you have shoulder problems, practice it by keeping hands on your thighs.
- Avoid this asana in case of any knee or hip injury.
6. Pranayama
Steps:
- Sit comfortably on your mat and sit straight so that your back, neck, and head are aligned.
- Relax your jaw and your tongue.
- Relax and open your mouth enough to inhale. (do not open your mouth wide)
- Inhale and exhale through your mouth and feel the air passing through your windpipe.
- Please note that when you exhale, the type of exhaling should be like the one when you try to fog up any glass. When you do so, there is a slight contraction on the back of your throat.
- After exhaling this way try to inhale with the same contraction, when you feel you can do it right, then close your mouth and inhale and exhale from your nose with the same contraction in the throat.
- Keep focusing on your breath and the sound of your breath. Let that sound soothe your mind and you will find peace around you.
- Repeat this till you feel peaceful.
Precaution:
- Be careful not to tighten your throat
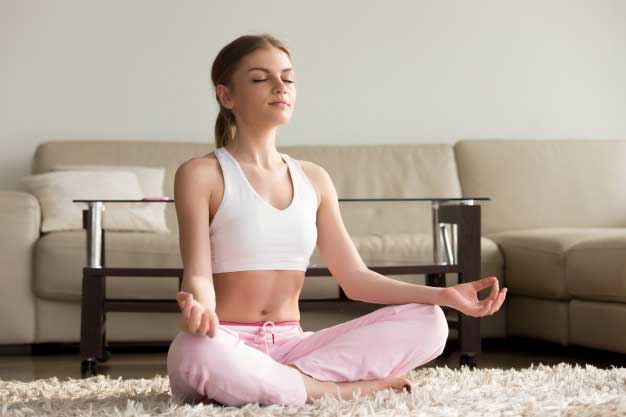
7. Meditation – Talk to your baby.

Steps:
- Find a comfortable position and relax.
- Place your left hand on the belly and right hand on your chest near your heart.
- Keep focusing on your breath, inhale deeply, try holding your breath for 3-4 seconds and exhale slowly.
- Now while focusing on your breath, feel the movements inside your belly, start talking to your child.
- Talk about your feeling and everything you wish to share, this creates a positive environment for you and keeps your mental health in a peaceful state.
- Trust yourself and believe that you are a strong woman and have prepared for the best experience of delivering life.
Through Yoga, we wish to create a healthy environment for every existing atom. A World which cares about the physical well being as well as mental well being. A genuine trial towards a positive environment for the best experiences in life.